


Yea for a Rag Rug Tutorial! Today I’m going to walk you through how to make a rag rug out of old sheets! How To Make a Rag Rug with this Rag Rug tutorial, this post may contain affiliate links.


This is a perfect project to tackle while watching a show, movie, or even the Olympics! (I think I’ve already mentioned that I LOVE watching the Olympics – every sport is so fascinating!) I normally don’t watch so much TV, so I feel like I need to do something while I’m watching. It had to be something I could sit and hold, that required minimal thought. This yellow Rag Rug was perfect – I made it while watching last week.
Last summer Olympics I did the same project using different sheets and material – I made it for my girls’ room and I actually like it better than the one I just made, but I wasn’t in tutorial mode back then. Here’s a visual so you can see how the rug looks in different colors and shape (round versus the oval).

How To Make a Rag Rug
Supplies:
–Fabric (I used old sheets! check the thrift store for a deal!), or you can find sheets online.
Rag Rug Tutorial: First, gather some fabric – if you go buy it, this project is going to cost more than you want it to. I suggest using old sheets – keep your eye out for them at thrift stores and yard sales. The pink/purple is from sheets – the yellow/white is actually discarded curtains I had made years ago to divide a room.
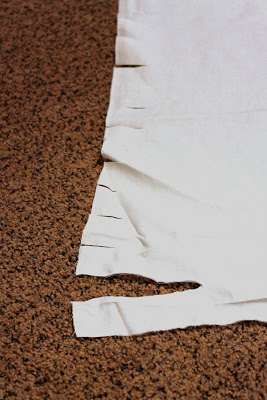
After finding your fabric, turn it into strips – mine are about 1 1/2 inches wide but I didn’t measure each one – just guesstimate. You can cut them, but I found that ripping went much faster. To do this, just cut the starts to your rip lines, then rip the rest, as shown. Then wind up the strips into balls – it’s an extra step but you’ll be glad you did it.

Now I don’t want to scare anyone away, but this is a crocheted rug. Don’t panic if you don’t crochet – it’s really just making loops using a hook. You can do it. Go buy a big hook. Here’s a video on the basic loops you’ll be making – watching it, you’ll think, “that’s it?! I can do that!”
Did you see where you poke the needle in to grab the loop? Here’s a picture – usually it’s not so defined, but I stuck my finger in the holes so you could get a good view. And if you can’t find the exact hole, don’t worry, something close will work.

If you’ve watched the video or noted the picture, you know that I started in the middle of the project. That’s because I wanted you to know how easy it is once you get started. The downside to crochet is that the beginning is always the hardest – and who wants to start something they’ve never done at the hardest step? – no one, but trudge through it and it will get easier, I promise. So here’s the beginning, via video:
Once you get a middle to your rug started, you just go along making loops like the first video showed.
Rag Rug Pattern
Now, if you glazed over the videos because you know the basics of crochet, then let’s get back to the rug. Think about running around a track – the person on the outside lanes has to take more steps than the person on the inside lanes to make it around – they can take the same amount of steps on the straightaway. So you make crochet stitches along the straightaways, but when your making turns (a circle rug is just one big turn) you’ll want to make a chain stitch every handful of stitches – that’s like taking an extra step to make it around. You make a chain stitch like I showed how to start – you don’t poke into any holes, just make a loop on the strip.
Creating Continuous rag strands
Another thing unique to rag rugs versus normal crochet – your balls aren’t one continuous strand. You don’t have to sew them together – there’s an easy solution. You cut a small slit in the end of a strip – then thread the beginning of the next strip through the slit, and fold it over – hopefully you can see how in the pictures on the left.

You’ll have to let me know if you have any questions and I’ll do my best to answer them – obviously I’m no crochet expert (I can’t even remember what this stitch is called – double crochet?) but I’ll try to let you in on what little I know.
Finishing your Rag Rug
You just keep going around and around until it’s as big as you want it. After you’re done, you tuck in any strips ends that are showing (there will be a lot) – just push them to the underside of the rug. I was aiming for a smallish rug. Mine got a little wonky in the end, but that’s what I get for not knowing how wanting to use a crochet pattern or anything. I think I just added too many chain stitches around the corners be cause they don’t lay completely flat – but I’m just claiming that it’s the charm of handmade (and I stuck the weirder side under the changing table so it’s less noticeable). Hope you enjoyed this Rag Rug Tutorial!
Even though it’s a bit wonky, I think it warms up the corner in my little boy’s room.

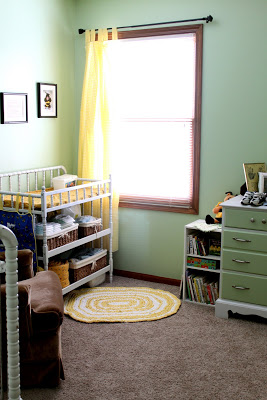
My goal was a cozy little corner where he might want to check out a book or two. I guess it’s working, maybe a smidge too well….

Rag Rug Ideas
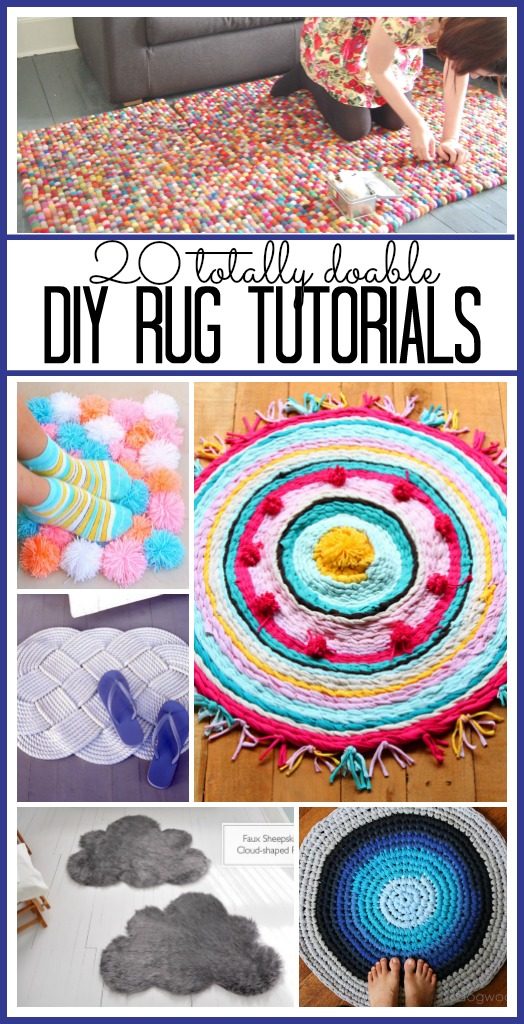
If you love DIY Rugs, I have a bunch of other ideas you won’t want to miss!! 20 DIY Rug Tutorials:
Oh my goodness. I loved this. You made it seem so easy. Thanks for much!
So cute and SO easy! I will be making one soon! Great job!
In the rug I am working on, I have found that when joining strips, it sometimes helps to cut the corners off the strip without the hole…it reduces unwantet bulk, making it easier when you come back to that point on the next go-round.
Great idea….
I’m gonna try this…i lost my rag stash in my move…n we donr have any thrift stores around, so I’m gonna start collecting….i started a project with ‘plarn’ but im not fond of the way it feels…so it’s gonna be a long time projevt, lol…
Thanx for this tutorial n bless you always, all ways
I went to the goodwill and about 3 sheets that complemented each other for $3.75. It made a rug big enough to cover the floor in front of my sink.
Great directions! I have a huge stash of fabric just sitting in tubs, I think this would be the perfect project for it! Going to get a giant hook tomorrow!
Oh thank you for sharing this, I actually have one. My grandmother made it years ago and it just happens to be the perfect color for my baby’s bedroom. I love it, and will have to make one ASAP for another room!
Thanks!
I would love it if you had the time to check out my blog. http://www.remodelaholic.com
I love this! I just started to throw out a bunch of badly stained sheets…and now I will NOT throw them out…I’ll make them into a rug! Thank you so much!
I loved your article on making a rag rug. I will do it! 44 years ago I crocheted a yarn rug for the nursery, baby was on the way. (Didn’t know how to crochet) Still have the rug and was so proud of it. Just never could let go of it, guess it is time to give it to my daughter and start the rag rug for my great grandchild. Thanks for the idea.
Thank you so much for posting this! I have watched countless videos (even one that I purchased!) …. your instructions and vids were clearer and easier to understand.
Great Job!
Found you Via One Pretty Thing and I’m so glad I did. Love, love, love this tutorial. Great attention to the details. I know how to crochet but I stink at reading crochet patterns and this is a project that I know I’ll be able to do thanks to your great instructions. I know I’ll be making this rug soon. Thanks again.
Thank you so much. I had already started a round rag rug and kept taking it all apart because I couldn’t figure out how to stop it from curling. I tried to overcompensate by making the loops bigger but that only created excess so it rippled. Your tutorial helped tremendously. 🙂
Thanks so much for the tutorial!!
Got a kick out of seeing what you
said and your little boy with all
the books on the floor. Cute & funny!
God Bless You and Yours!!!
Look at you Mandy-your blog is a HIT-as is your adorable rug! LOVE it and the colors!
Thank You for this great tutorial! I bought one of these at a craft fair for $60 and used it for years. Now I can make my own.
Adorable! Could you tell me how many sheets it took and about what size it ended up so I’m sure to have enough of the right colors before starting?
Thanks!
How do u increase the rows? How do u know how many extra stitches to increase row by row?
This is so cute!! It makes me want to make one, but I have never made anything… When I’m ready, I’ll come back and watch this tutorial!
A few answers to questions I’ve been receiving:
I’ve washed the pink/purple one – I figure sheets are washable so the rug is too. A few strips needed tucked back in after washing, but that’s all.
The pink/purple rug is about 3 to 3 1/2 feet in diameter. I used one twin sheet set in pink, one twin sheet set in purple, and a top sheet in white, along with some random white fabric I had. How much you’ll need not only depends on the size of rug you want, but also how tight you crochet. I’m not sure how much material I used on the yellow one because it was old curtains – I wished I would have measured the yardage, but there’s no going back now!
As a long time crocheter, let me say your rugs looks great! (the stitch you’re doing is a single crochet, by the way…but good guess! )I’m going to have to check the rest of your blog out, looks like my kind of place! 🙂
What a great rug…someday I may have to take a stab at one. Thanks for sharing all your tips…
i have a question ,How do you finish it?
I wish I had pretty yellow and white fabric, but I guess my old faded blue sheets will have to do.:) One quick question, did you use a size ‘Q’ crochet hook? If I use a slightly smaller hook, will it just make smaller, tighter loops, or will it be too hard to work? I knit, but don’t crochet, so I was thinking the smaller hook would just affect the ‘gauge’, but it would be nice to know for sure before I start. Thanks!
Back again with a few more answers:
finishing the rug – I should have talked about that – all you do is stop crocheting. Just tuck the end of the strip back into the rug. I tried to stop where I thought it looked least noticeable.
My crochet hook didn’t have a size – it comes in a 2 pack with a gigantic blue hook and a huge gray hook – I used the huge gray one. If you use a smaller hook, it’ll just be tighter loops – a little harder to work with but it’s doable. Just make an effort to try to leave your loops a little loose.
I’ve always wanted to do one of these but have never known anybody who could show me how. Thank you!!
Great job! I’ve been meaning to make one of these forever – I even have the fabric laying around. Maybe now I’ll be motivated to try it. Thanks for sharing!
Amazing design!! Spacify has a collection of modern Buy Rugs with an array of modern designs. Each has its own great look that will find a way to enhance your home
I just bookmarked this to check out later when I have more time (a 2-year-old is tugging on me at the moment). I’ve been toying with the idea of a braided rug, but I like this better! Thanks for the tutorial!
Great tutorial… thanks for taking the time and being so thorough!
Awesome tutorial Mandy. I believe it’s the best one around! I have been meaning to start one of these but I definitely need a larger size hook. Very beautiful rug!
Do you think this will work with ripped up tshirts (t-shirt yarn)? I have a bunch that I ended up not using for a project and I think this would be a good replacement.
Great idea, by the way!
Love this rug! Perfect for your little boy! I will have to try this rug I have so many sheets in my house that I don’t use but just cant get rid of finally something I can do with them!
definitely gotta do this once I can find a big hook!
How amazing is this? SO AMAZING! What a great entry into Iron Crafter! Brilliant!
I love this and can’t wait to try one myself. I’ve never crocheted before and honestly I find it a little bit intimidating, but you make it sound easy enough for even me to try! 🙂
WOW! That is so cool! I wanted to let you know that you made it in the top 10 Iron Crafters!
https://firefliesandjellybeans.blogspot.com/2010/07/iron-crafter-sheetspillowcases-top-ten.html
I’ve always wondered how to make a rag rug! thanks for the tutorial!!
Everytime I see rag rug, I remember my grandmother. She also loves making this. In our home, we have a lot of of rag rug collection from my grandma with lots of different designs. Though we already have carpet in our study room, my mom put rag rug to the door. My mom is really meticulous on household chores. She wants everything are clean and organize. Even she have busy sched, she’ll find way not to miss any household chore like carpet cleaning. Bartlett, our hometown, carpet cleaning (Bartlett Illinois-based) services are popular among housewives and bachelorette because it is very helpful to lessen their worries on household chores.
Thanks for posting this! My Great-Grandmother and her mom made these! I have one they made in my son’s room! It is so nice to be able to know how to make one!
Wow, love it!!
Hello, I just watched all your videos and I have a quick question: how do you finish the end of the rug? I saw you mentioned tucking loose edges/ends of fabric to the back of the rug but how do you finish the last piece? Do you weave it back through? I just want to make sure it is secure so it doesn’t unravel. Thanks!
-Kristi
@Creative Kristi
….or, you could just make me one!!
Thank you! My mom made one of these when I was a kid and I’d completely forgotten about this technique. I’m so glad I saw your tute on TJ! I can’t wait to try making one for me!
I saw your post on Tip Junkie and immediately wanted to make one. I finally got around to shredding my old canvas tab curtains got started. I have to say, that is not the best choice of fabric. It was SO hard to crochet, my hands and wrists are sore and swollen today. I misread your line about the extra chains and went a little crazy with throwing them in there so my rug “looks like a flower”. That was from my 4 year old. She loves it and hence it is hers. I’m definitely going to try this again, but with more flexible fabric and much fewer extra chains! Thanks for the tutorial!!
I made a jean rug using this method. Thank you so much for sharing. It made it so much easier.
I have been looking for a rug for my baby’s room. Haven’t found one that matches. I made all the bedding, curtains, etc…and wanted one that was the same shade pink as the fabric I used. Luckily I have plenty of fabric left. Just went out and bought the 2 pack of crochet hooks you mentioned in a comment. Going to start on this rug asap! Baby due in exactly one month. Hope I can finish in time. Found you on Tip Junkie! Thanks for the aweseome tutorial!
Just a bit of info, the two-pack you bought: the grey hook is 15mm and the blue one is 19mm. Sizes Q and S, respectively.
Love this rug. Gonna go try one myself. :]
Your race track analogy is great. I have crocheted for years, but I really liked that comparison. 🙂 My sister and I tried to make rag rugs once, I can’t remember what stitch or whatever we were using, but it never turned out right. I’ve never tried to teach anyone how to crochet. = I may just send her this page! lol 🙂
I keep trying to make a circle rug but my stitches seem too tight and it ends up looking like a bowl. What am i doing wrong?:(
I have had this same problem! i went several rows out to see if it just needed to wear and the problem only gets worse. 🙁
I love this. I have always wanted to make one out of my scrap fabrics. I never want to throw any away. You make it look so easy. Thank you bunches.
I just found you via Pinterest and I am SO glad! I recently learned how to start the rug, but I wasn’t sure which holes to crochet into while making the constant circle. The tutorials I found on YouTube were so frustrating because they’d only teach how to start, but nothing specific. Thank you!
Omg, I am dying to make this RIGHT NOW. THANK YOU THANK YOU! Found you via Pintrest and I’m so glad I did. I am going to get to the craft store for a hook TODAY!
I love your tutorial, it makes this super easy to understand. The only problem I have is that my fabric (from a sheet) is fraying at the edges, so I feel like the rug it getting “messy” looking. Is there any fabric that won’t fray? Or do you have any tricks to help hide or stop this fraying?
I just wanted to let you know I included this in my 2011 Ultimate DIY Gift Guide (101 tutorials/recipes)! 🙂 https://danimariedesigns.blogspot.com/2011/10/2011-ultimate-diy-gift-guide.html
Love this tutorial and I have the perfect room that needs a rug like this. I have a question about connecting a new fabric strip. I’m incredibly visual and I’ve looked at those photos over and over and still don’t understand how you connect to a new fabric strip. Could you explain a little more?! Thank you so much!!
Ditto all the great comments everyone has posted. I just wanted to comment on your intro about having to have something to do while watching the Olympics… I am exactly the same way. For some reason, I feel like I can’t just enjoy television without doing something with my hands!
Keep up the great work!
Julie
Thanks again for such a wonderful blog post about this. I feel like I’m ready to go find some old sheets and start a rug for my little boy’s room! Thanks!!
VERY easy to understand tutorial. Thank you so much. I’ll get right on it. 😉
Such a great tutorial! Exactly what I was looking for to create an entry way rug! Thank you 🙂
Love this! You make it look so easy!
Found you on Pinterest! This is awesome! Thank you! I’m not very crafty, but love crafty stuff and wish I was. I can usually follow someone else’s directions. Thanks again.
I REALLY LOVED THIS RAG RUG AND KNEW I HAD TO DO IT…SO FAR I’VE DONE IT AND RE-DONE IT…SEEMS I’M DOING SOMETHING TOTALLY WRONG…IT KEEPS ROLLING UP BOWL SHAPED…WHAT AM I DOING TO MAKE IT DO THAT??….THANKS
try adding extra stitches to make it lay flatter….
So how do you connect the strips of fabric after you cut them? I’ve heard of some sewing them together and some who leave them attached at one end.
Oh nevermind, I read further! So you just wound the separate strips into balls and attached them to each other as you crocheted the rug itself, right?
that’s right, Steph – – attach them as you go
I love the charm of these handmade rugs and this is looking like the next project I want to try.I’am not very good at crochet but your video was very helpful and I can finally use up some of my enormous fabric stash,Thank You!!
I’ve glanced at crochet tutorials before, but finally took a longer look yesterday when I happened upon a bunch of jean strips I’d cut for my boys’ room 2 years ago. Your tutorial was just what I needed to get started. Thanks! OH, and I hope you don’t mind if I link back to you if I ever get around to blogging my progress…
How big is the needle you used?
Good job and so easy Sagrb Thank you
I saw your tutorial over on pineterest. Your rag rugs are so beautiful. My great grandma used to make these out of bread bags or plastic grocery bags as outdoor mats. I never thought to make one out of actual cloth before. I’ll have to give it a try for my entryway 🙂
My aunt use to braid rugs out of old clothes etc. She would get down in the floor and braid them. I loved those rugs. This looks so much easier! Thanks!
So you learn something new everyday! I just read this because I wanted to see how you do the round ones, I never had luck with round so had to make square ones.
What I am really excited about is not having to sew the strips togather, can you imagine what kinda time this will save me?!!
Thanks so much for this, I have been wanting to learn to make one of these, I am cleaning out and it will be great to make useful things out of old material!
Tamika @ http://www.notimefortea.com
Which kind of thread do you use and what is the size of thread?
Gift Card printing
Scratch Cards
Plastic Business Cards
Can you use old t-shirts and blouses? I ask this, because my sister passed away and I have her shirts that I was trying to figure out what to make with them for me and my other sister. I am not a quilter, but I do crochet. How would I cut up the shirts to make the yarn? Thank you for your help!
I’ve never tried old tshirts, but I bet it would work. To make tshirt yarn you cut the shirt into strips (parallel with the bottom of the shirt) then pull on the strips and they turn into tshirt yarn. Good luck!
you make it look so easy…I like it.
Roman shades concord, ca
Just ordered some big crochet hooks to try this! Thanks for sharing 🙂
Great tutorial! What size hook did you use? I may head to my local hobby store today & get started this weekend!
I’m not sure what size hook it was, but it was the biggest they had when I went to buy one – – it’s plasticy and gray…
Hi, I used your pic and linked to your blog today. I hope that is OK, if hot, let me know and I will remove it. libler.blogspot.ca
I crochet alot, so I am wondering, is there a reason why you use a chain stitch to increase rather than crocheting 2 sc into one?
This comment has been removed by the author.
I have about a zillion t-shirts that I would like to use for a rug, either crochet or latch hook, or maybe something else entirely.
Any ideas?
Woofi
Greetings:
I was watching your videos today on how to make a round crocheted rag rug. I noticed that when you were making the round rug, after you joined the circle and began to make your stitches, it appeared you were making slip stitches instead of single crochet stitches. Is this the case? Thank you, L. Qualls
Hi there. I just wanted to let you know that I loved this tutorial so much that I linked it to my blog. It’s included in an article I wrote about re-using old clothing and textiles. you can find it here http://www.chappellavenue.blogspot.com Please let me know if you would like me to remove it and I will. Keep up the good work!
I have looked at your pictures several times and am having trouble figuring out what you do to secure the strips after you slip it through the slit, it says you fold it over. Do you not have to sew it or something else to secure it? Thanks for posting this wonderful tutorial- can’t wait to try it!
You’re right Peggy – – you just fold it over – you don’t have to secure it because as it’s woven in to the rug, it will hold itself
This post goes back a long way, I know, Lol!! But I have just found it so wanted to say ‘THANK YOU’ for posting the tutorial! I have always wanted to have a go at making a rag rug. A neighbour in Nova Scotia used to make them and they were so beautiful!! She used to hang them all out on a line on the front porch so that passers by could see and perhaps would buy them. They were soooo colourful, I just fell in love with them! So thank you for the tutorial to help us beginners! 🙂 I’ve got sheets all ready and I’m dying to try it! I do crochet so hopefully I won’t find it too challenging… 😉
Just a wee tip, if I may? When you are connecting your strips: If you cut slits in both ends of each strip, put one strip in each hand, matching two slit ends together. Now thread your left hand strip through the slit in the end of the right hand strip (Just as the way you suggested). BUT – then thread the OTHER END of the left hand strip that you just threaded through the right hand strip, through the first slit that you just passed through that right hand slit). Does that make sense? Basically what you are doing is taking 2 strips, threading 1 strip (lets call it ‘A’) through the other strip (we’ll call it ‘B’), then creating a circle by threading that other end of strip ‘A’ (that you’ve just threaded through the 2nd strip,) through the hole at the other end of Strip ‘A’. Then when you come to thread the next strip, you do exactly the same… A strip threaded through each end of each strip. There you have a long line of strips without any loose ends or any knots, or whatever…
That way you join them without having to fold – and thus NO ENDS TO TUCK IN! And it keeps all the ends secure. Which may help you when it comes to washing the rugs. No ‘stray’ ends will come out. 🙂 Hope that’s been helpful! I can see what I’m doing, in my head. But perhaps I’m not terribly great at explaining! Lol!
Anyway – thank you again for the tutorial! 🙂
thanks, I’ll have to try that!!
I’m having trouble with joining the strips – I understand making a slit, then inserting the other piece and folding it over, but what do you do after you fold it over?
after you fold it over, you just keep crocheting. There’s no need to tack it down or anything, because as it gets crocheted into the rug, it will hold itself into place. Good luck!
Mandy – I’m having an issue with starting the round rug…it’s turning out a little “puffy.” The circle lies flat, but if I push the middle out, it turns into more of a hat shape. What should I do differently?
Thank you so much for posting this! I’ve made the round rag rug and didn’t know how to make the oval one. With your tips I figured it out! I’m making mine out of old t-shirts (which make for a very soft rug). I’m hoping to save money for Christmas present this year and this will make for a great gift!
I need help! Mine is puffing up to a hat! What should I do?
Your hooks are sizes N and P.P is larger.
I really, really need a new rug. Do you think I could make it squared?
I think to make it square you would crochet back and forth in rows, not around in a circle. Good Luck!
I hope you don’t mind if I answer some of the questions you have gotten here. T-shirts will work great for this project if you cut them into t-shirt yarn (lots of good tutorials out there via google and youtube). I always thought the gray crochet hook was a P and Blue is Q but either way they do come in a two pack at walmart and either can be used for this project but gray is easier to handle. For those that have trouble getting it to lay flat…if it looks like a hat, there are not enough stitches in the round–on the second time around, you should be doing 2 sc (the stitch used here is a single crochet or sc) in each hole (for a round rug), in the next round, you will do 1 sc in the first, 2 sc in second hole and repeat, alternating 1 and 2, next round, sc, sc, 2sc, sc, sc, 2sc. Each round, you will just add one sc in between the 2sc,, so round 4 would be sc, sc, sc, 2sc, sc, sc, sc, 2sc etc. If your rug looks ruffled, don’t do so many increases in a round. The rule of thumb is no more than 10 increases in a round. So, if you start with ten stitches in a circle and do 2sc in each stitch for the second round, you have only done 10 increases, then if you do 2sc in every other of those 20 stitches, you have still only increased by ten stitches. Hope this helps some of you who had trouble! (One of these days I might do a tutorial myself lol).
I’m a beginner,I’m going to try making the round rug.
I don’t really watch much if any television but when the Olympics was on I couldn’t stop watching it. I thought it was so amazing to see these athletes with such passion for success in their sport. I love the finished project. using yellow and white fabric was a good choice.
-Zane of ontario honey
Thanks , I have the torn sheet strips and I am going to try to do this! Your tutorials makes it look easy although I cannot crochet!
Smiles, Cyndi
Found you on Pinterest! i will have to try to make this. Haven’t attempted a rug yet.
-Alison
aniemandesign.blogspot.com
You are freaking awesome! Found you on pinterest as well. Sooooo glad I did!
I found you on Pinterest also. I’m going to use my old T shirts
Pinterest is also where I found this! I can’t believe how easy you made this look! Thank you so much for doing this, I’m going to be sorting through some old sheets and asking friends and relatives if they have any unwanted ones now as I really want to make some rugs to make our home cosier!
Love this! One of the easier tutorials I’ve seen.
Will have to try it soon so I can stop using a blanket as a rug 🙂
take a dowel and make it the length of the hook you want. next take a crochet hook and with a pencil mark a pattern on the dowel. Next with a sharp knife or tool that will cut the dowel, carve and then with sandpaper smooth the “hook”. I’ve made many in sizes of different length and circumfrence. Try it and see how easy it is. Afraid? Ask your husband, dad, son, you get it some male member.
I”m 77 and still make them.
This has gotten me interested in rag rugs in a way i was not before and i’m commenting because my parents have the same striped sheets you’re using in your picture (in their rag sheet pile now), but i remember them well growing up!
Regards,
Irene of Fishing Oregon
Mandy your rugs are so warm and happy! I have been wanting to make one but it seemed so troublesome with all of the prep work. This is so freeing – enough for me to give it a whirl. I love to cut with my rotary – so this is a win win!! I do have minor crochet skills (granny squares). Thanks so much and blessings to you.
Thank you! My friend has two huge rugs that she made and I’ve always wanted to do it, they are so beautiful ~ I just had a few questions about how to attach the strips to one another, which you cleared up – and now I can get started. Thanks for your post!
This is an awesome tutorial! My great grandmother used to make these, and I’ve always wanted to know how to. The house I’m renting right now needs a rug BADLY so I’ll probably be attempting this. But I have a quick question. If you’re making an oval rug, do you just make a longer loop and kind of hold it in an oval as you get started? Do you need to sew together the straight parts of the oval to keep from having a slit down the middle? (I guess that was two questions, but oh well)
Thanks!
Right Amy – – in the beginning you would add more crochets to make the starting point a longer loop. Good luck with it!
Hi, Amy! Instead of making your chain into a loop/circle, you keep it a straight chain. Then you turn it backwards on itself and crochet all the way around it. So. To start out, make a chain, and then do your first single crochet stitch in the second chain from your hook. Keep crocheting, and when you get to the other end of the chain, you crochet around it to the other side. I’d look for some tutorials on youtube (crochet by teresa has wonderful tutorials). You can watch it all in slow-motion, step-by-step. The stitch is called a single crochet. The oval is commonly used in patterns for the bottom of baby booties. A video like this might help: https://www.youtube.com/watch?v=_B9BinO3ULg If the spaces in the middle bother you and you’re ambitious enough to add another step, then start out with a “foundation single crochet,” instead of a chain, for which there are numerous tutorials on youtube as well. Best of luck!
This comment has been removed by the author.
I’m doing a round rug and it keeps curling in on itself. Any idea why? How can I stop it from doing that?
try adding in more single crochets and see if that will help… good luck with it
how long would one in a circle take to make?
Just a comment to say “Way to go”. This may just keep another craft skill alive.
Not only that, but it keeps all those done for sheets and T-shirts on a second run around the track.
I’m backing you mightily!
Ohhh, I love this! I am definitely going to do it! If the following is helpful to anyone, the stitch is called a single crochet, and the hook is a size P. Here’s the link for them at Walmart. https://www.walmart.com/ip/Jumbo-Crochet-Hooks/17354831
Thanks Jenn. Do you remember the # of the hook? Could it be a 10 possibly?
Ohhhh, the wonderful memories! Many posts have mentioned recalling their grandmothers’ or aunts’ wonderful rag rugs, but I haven’t seen any ‘outdoor’ variety posts. My grandmother raised her farm family during the Depression & never wasted ANYthing. Always busy with her hands, she used what she had to live out the “necessity is the mother of invention” proverb. In addition to rag rugs & piece quilts, etc., I remember so fondly seeing her make “back porch rugs” with the ‘new’ store-bought (plastic, therefore weatherproof) bread wrappers. Thank you so much, Mandy, for the sweet memories & helping keep this craft alive – especially in this – all too often – throw-away society. : )
I notice there are not many frayed edges on your strips. Do you fold them over and iron them because I didn’t see that step at the beginning. Thanks!
I didn’t – – they kind of fold over as you’re working with them, but there are some parts where you can see frayed edges and I don’t mind it at all.
I think I might do this with my old sheets, but i might try it as a never-ending granny square. Sounds fun.
I love rag rugs. This is something I think even I can make! We shall see.
Adorei……..É uma reciclagem maravilhosa.
Adorei……..É uma reciclagem maravilhosa.
Hi Mandy~
GREAT project…I remember making this kind of rug my Grandma taught me back in the 60’s back in Honolulu!
Now I will make it with all the fabric my Mom and I have collected over the years!
Thanks so much…~Judi
Thank you soooooo much. I’ve just made my first ever rag run (oval) and it looks just wonderful.
I love this and can’t wait to try one myself. Thank you
Can you tell me where the pattern directions are.
I don’t have a written pattern, sorry!
Mandy,
Thank you so much for taking time out to make these step by step videos! The rug is exactly what I have been looking for and having been dying to make. I actually have fabric all cut and ready to go, I just was a “BIG CHICKEN” at trying to get started since I didn’t know how to make each row (aka. circle, oval) bigger. I knew I would end up with one big knot or simply a tower of crocheted fabric. Obviously, neither one would do me any good. But, you have made this out to be so simple. I now need to grab my fabric, hook, and get to work. I can’t wait! I am also really looking forward to checking out the rest of your site, as you seem like my kinda girl when it comes to the crafting world. Again, I thank you from the bottom of my heart for showing me how to make the rugs I loved to play on when I would go to my Great-Grandma’s house over 30 years ago. Not only will this be fun to make, but it will bring back wonderful memories. God Bless you, Mandy! Love in Christ Jesus, Sydni G.
You can do it!!
Hi Mandy,
4 years on and your tutorial is still going strong – hurray – the internet has many advantages.
Thank you for your words of wisdom, they are very inspiring.
All the way down to Auckland, New Zealand.
God Bless, Sharon
About how long did it take you to make the yellow rug starting with the tearing/cutting of the fabric?
Great question – I’m not sure – probably about a week, just working on it in the evenings
I was wondering after saw your wonderful tutorial is it possible to use a standard needle? I don’t have one of those larger ones that was shown in the tutorial. I have a feeling it might take a little longer by using it, but that’s okay was just curious if it could be used. Thanks!
I say give it a try! I think it would work, but would just be tighter and take longer, like you mentioned. good luck!
I absolutely love these rugs,wasn’t sure how to make them, I thought crochet was involved but I wasn’t sure,now I have got to get busy-Thanks for the tutorial ans the share,will enjoy these for winter projects…..you wouldn’t happen to have a crocheted winter bootie pattern would you?My Grandmother use to make them, and I can’t find one anywhere that fits her style-they look more like moccasins than booties,very warm.please let me know.Take care, and love you site.
Hi fab tutorial, do I need to fold the strips in half as i roll them yours look much neater than mine. many thanks.
I didn’t, but I did try to pull off loose threads, etc
Hi lov ur project Rag Rug tutorial but Iam not able to see the videos 🙁
here’s the direct link to the video – hope that helps! https://www.youtube.com/v/VyYpndHRHTU%26amp;hl=en_US%26amp;fs=1%26amp;rel=0%26amp;hd=1
when u add chain stitches on corners do u do it same spot?? exact on other side?? stagger?? do u add on top of rug??/ i’ve heard 10:00/12:00/2:00. if so it has u adding on top also. some directions are vague like u have to figure out how many stitches to add. very frustrating cause i’ve ripped mine out 5 times cause it looks like a lima bean.
What a cute little rug!
One of my aunts had one of these rugs in her bedroom, she always told me she made it with a toothbrush, I don’t really know what she meant by that.
Shelly recently posted…What to do with Old Jeans – Make Denim Potholders
Hi there! I know it’s one of your older posts, but i just wanted to let you know that I featured your rug tutorial on my website. I love it – you are so talented! Thank you for sharing your videos so that others can learn. If you would like to check it out, you can visit
https://greyposy.com/diy-crocheted-rugs-people-dont-crochet/
Thank you again for sharing your tutorial! I look forward to hearing what you think. Take care!
thanks so much for the feature!
I am definitely gonna make one! I’ve been looking for a bath tug in a particular color and now i can make my own! Thank you for posting this!:-)
Do you ever have a problem with the rug “curling”? If so, how do you prevent this? Thank you!
I had one that had some curling, but laying it out flat helped and pulling it into shape.
Nice piece of art!
Thanks for the tutorial. How do these hold up with washing? I’m thinking of making one for laundry room where cats sleep and often love puking on the rugs.
Ps. My little guy reads like that too, books strewn everywhere!
Approximately how many sheets (and size) were used for each of your projects?