


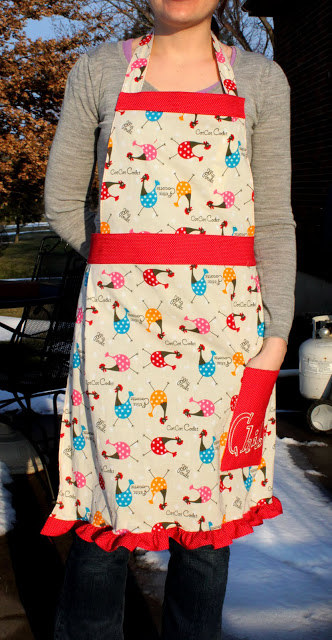
Everyone has a cute apron, right? Well, not my mom, and it was her birthday. I actually didn’t even think to make her an apron until I saw this chicken fabric (you know, she has the craziness of chickens) and it screamed “make me into an apron!” – so I did. I have only made half-aprons before (like HERE and HERE) but figured a full apron is just a half apron with a top, right? So this is my first full apron, and I tackled it without a pattern. I’m sure there are better ways to put it together, but here’s how I did it. With all the pieces already cut out, the assembly just took however long my son’s naptime was. Enjoy! on to the Full Apron Tutorial:
Update – – I made another apron using this same tutorial (for me this time!) and talk about it here: Full Apron Again
And I used a pattern and made one for my sister-in-law here: Inspired Apron
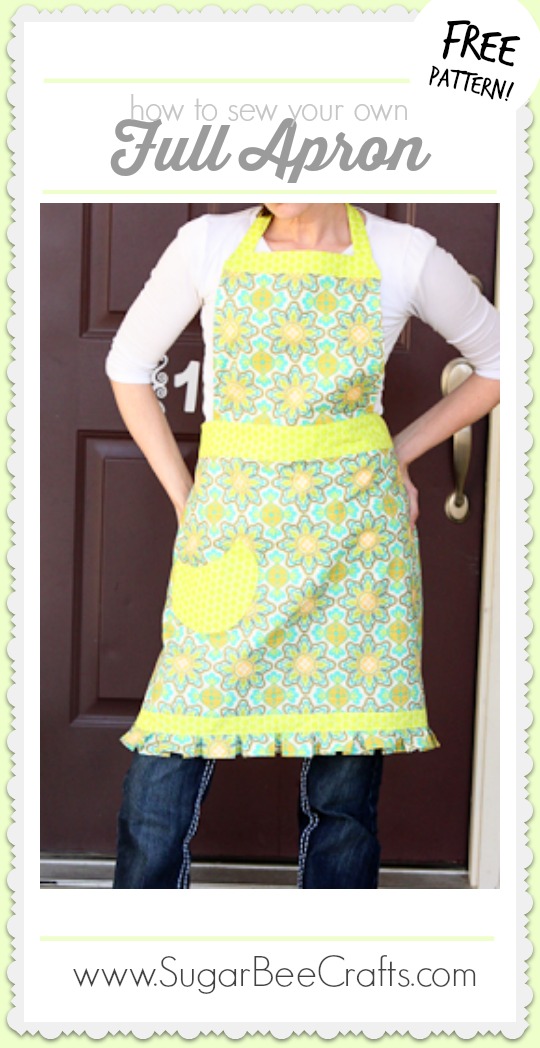
~ How to make a full apron ~
First pick out your material – fun material is what makes the apron super cute, so choose wisely. I bought 1 yard of my main fabric and 1/2 yard for my trim. I think I have enough leftover to make a matching potholder (add that to the project list…..)
-
 I cut my pieces as follows, but then adjusted them later – this is up to you – you can hold pieces up to yourself and see how you’d like them to fit. Here’s where I started, measured in inches: Bottom 28 wide by 19.5 long; Top 14wide by 9.5 long; Waist (cut 2) 28 wide by 3 long; Ties (cut 2) 28 wide by 2 long; Top Trim (cut 2) 14 wide by 2 long; Pocket (cut 2) scrap fabric whatever size; Neckband, cut to taste (I think mine was 4 inches long and however wide to make it all the way around my neck and hold on to the apron).

First comes the boring part of sewing – all the prep work. I love to see a project coming together and that doesn’t happen at this stage. But prepping makes everything ready to go. First the pocket.


First sew or embellish anything you want to put on the front of the pocket – ric rac, fabric flowers, hand embroidered name, iron-on transfers, or keep it plain. Then sew your two pocket pieces right sides together – leave a hole for turning and clip your corners (see first pic). Then turn it right side out and topstitch the top of the pocket to make it lay nice. Fold under where the hole is so you don’t see the raw edge – iron to hold it in place if you need to.

Place it where you want it on the bottom piece and sew around 3 sides (leave the top open). And the pocket’s done. Some cute pocket ideas: centered, off-set, two circle pockets, mini-pockets, one giant pocket, etc – get creative!

Now prep your ties. Fold them right sides together, sew up the edge, and turn them right side out. (During the turning I realized that next time I’ll cut my ties wider so it would be easier to turn – later I discovered an AMAZING tool that will turn it in a matter of seconds) Then iron them so that the seam is in the back, not on the side. Then turn one end in and sew it to finish it off. Set aside. Do the same thing to the neck band.

Prep the bottom – I added a couple of pleats at the top of the bottom piece to give it a little body. About 6 inches in from the edge I folded the top over on itself as pictured – you can sew this to tack it down, but I just pinned it. Then you’ll need to finish the bottom edge – you can hem it or add trim – I added a ruffle (I posted about it HERE). After you finish the bottom edge, finish the side edges – just hem each side. Fold over the edge just a little, iron, fold again, iron, and stitch it down for a permanent hold. Do the same thing to the sides of your top piece. Almost time to start putting things together. But first take your waist and top trim, and fold over and iron down the ends so they will look finished.

On to assembly – the fun part! Lay down one of your waist pieces face up, then place the top of your bottom piece face up, then lay down your other waist piece face down, as shown. Stitch the top edge. Then iron it up to make it lay nice, so the place where you sewed becomes the bottom edge of your waistband.

Next iron down the top edges of your waistband. Place the top piece inside the waistband, put the two waistband pieces on top of each other, and sew the top edge of the waistband. Notice how I ended up slanting in the sides of my top piece instead of using a straight rectangle – you can do it however you’d like.

Now put the trim on the top of the apron just like you did the waistband.

But before you sew the top edge together, sew a piece of velcro on the back side of the trim – you do this first so the stitching will hide inside the trim. Then when you sew the top edge of the trim, stick the unfinished edge of the neck band into the trim so it gets sewn in. Sew the sides of the trim shut as well. On the other side of the neckback, sew velcro where you would like it to attach to the apron.

Finally add your ties in to the open edges of the waistband – just stick the unfinished edge in the waistband. I folded the waistband a little at the end to reduce the size heading into the tie, as shown. Sew several times since this spot will get a lot of pull.

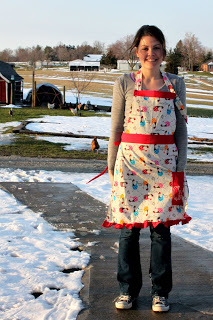
Voila! Cute chicken apron – here it is, with the chickens in the background. That’s not my mom, just my apron model. So go make an apron! They’re really fun because they give you the opportunity to practice sewing techniques (like that ruffle) and use really fun and wild fabric that you wouldn’t pick for anything else. Think of adding fun trims or ric rac or practicing using bias tape – you can do it! (oh, and does anyone know what the words on this apron mean? I assume it’s something to do with chickens – hopefully it’s nothing obscene….)
Thanks for checking out this post from www.SugarBeeCrafts.com – – click on over to read it in its entirety – you’ll love it!
You did such a great job with this! I LOVE that fabric, although I don’t know what the wording means, either. 😉 No matter, it is darling!
Great apron, I really like the pocket!
That’s a great apron – love the chickens!!!
The fabric is great, and the details so fun. Great job, thanks for sharing.
Love this! I love aprons to begin with and your is simply adorable!
Very cute! I have no idea what that word means either, but to me it’s the sound the chickens make. 🙂 Great tutorial.
This is adorable! And I am going to make one asap since I have been wanting a long apron. Thanks for the great tutorial!
Thanks for posting the tutorial! I love the ruffle at the bottom especially.
Adorable! The chicken fabric is hilarious. “Ma Poule,” means “My Chicken.” I’m not sure about the others, but I bet they mean something like “cluck, cluck chicken” or “little rooster.” “Petite,” as you might know, means “Little.” My slight knowledge of French tells me the words are NOT obscene, LOL. I know one and only ‘dirty’ French word and it ain’t on your fabric.
I bet your mom will just love her new apron!
Oh how I love this! I love aprons, and the full variety are definitely more functional than the half variety (or I’m just a messy cook- haha!).
We have a Friday Fun Find party (on Fridays, obviously)… if you’re interested, we’d love it if you’d link up this week!
This is the cutest chicken apron ~ love your tutorial! Thanks for sharing! ~Marcy
SO cute!! I love it. Nice work. And thanks for the tutorial! Feel free to stop by and link up for Make It Wear It @ TheTrainToCrazy.com!
This is such a great apron! I love the ruffles! : )
I have no idea what that word means, but it’s awfully cute sitting there on the pocket and where in the world did you find that cute fabric! I LOVE It!!
Such a cute apron! I love it!
Thanks for linking to CC!
This turned out SO lovely!! Man, how come I haven’t made me an apron yet?! Nice work!
Alison
https://oopsey-daisy.blogspot.com/
So so cute! I love aprons! Thanks for the great tutorial!
Thanks for linking up to Make it Yours Day at My Backyard Eden!
That looks great! I have been stalking that fabric at JoAnne’s myself–it NEEDS to be an apron. I’m so glad you helped it live up to its full potential :0)
This is so cute! I love the fabric.
I am featuring a necklace tutorial and giveaway. I’d love it if you stopped by my blog!
I love that fabric! Adorable!
Cute apron!! I’d love it if you’d consider linking up at my “Sew Cute Tuesdays”! I started it as a way to get some project ideas (I’m new to the whole sewing thing!). You can check it out at https://thecreativeitchboutique.blogspot.com
oh, man! i wish i had seen this last week!! i was waiting for an apron pattern to arrive, and it never came in time for me to make it for mother’s day!! this is adorable!
I’m visiting from Tuesday Tag Along… and have become a follower of your sweet blog. I’m so happy I found you..love this apron tutorial.. well,truth to tell, I love aprons…all aprons,any aprons. Come visit.. I also have a recipe blog I share with 2 friends..it’s
https://sueskitchen.blogspot.com/
I just found some of that material at Hobby Lobby and I had to buy it to make an apron!
Found this via your Linkwithin. Love it. Pretty sure it’s going to be on my project list for this weekend!
My church needs 15 of christmas gifts from me. After researching different tutorials out there,in my opinion, your design is the most suitable for making a special gift for your loved ones. I actually made one to see if the size you gave here fits most petit chinese ladies. It turned out still a little big for me. I am 110, 5’3. And I am here asking you if I could use your tutorial to make church gifts? not selling just for a good cause. Of course I will do a little of adjustment, JUST so I AM NOT STEALLING FROM YOU. 🙂 I will do embroidery designs of the name of my church on the pocket. And I will post my project on my blog to let you see! xxoo joyce
So recently used your tutorial to make a smaller version of that apron for a costume. It was super easy to follow. Thanks
As for the word CHIB on the apron youre gonna laugh. I know two forms of that word. First theres a Korean restaurant that serves Tak Dong Chib which is chicken gizzards. Can’t figure out which words mean chicken and which mean gizzards. Maybe it means chicken in Korean! hehe
The other translation, and this one is more solid, though random, is scottish slang. A chib is a knife and to chib is stab. Its like our our word for shiv or shank hehe. I’m sorry if that taints your idea of what the word means to you!
Congrats on the use of your tutorial on ucreate!! 🙂
I just finished the apron! Thanks for the tutorial! I linked to you at http://www.addicted2tutes.blogspot.com
🙂
Thanks for the tutorial!! I just finished mine: https://i16.photobucket.com/albums/b14/swordfern/Apron4.jpg
That must have been a great nap for you to be able to sew that entire cute apron while the little one was snoozing.
Three cheers for great naps!
Hip, Hip, Hooray!
I have a little food blog and have a friend who is going to take some pics for me. And I need a cute apron! I have some fabric, and now, thanks to you, I have a pattern.
Now if I can just get my kids to take good (synchronized) naps!
Thanks for this fab tutorial!
Have a blessed day,
Ginny
http://www.cookingwithchopin.blogspot.com
Many thanks for the tutorial! I modified it a little for my simple sewing skills and compressed deadline – worked great! Much appreciated.
https://wp.me/p7zcS-Nx
Hey there! I featured your apron tutorial on my blog today!
https://theadventuresofroryandjess.blogspot.com/2011/03/apron-tutorial-round-up.html
Thanks for the tutorial and inspiration!
Jess
Hey there Mandy! Love the simple tutorial and I am using it as a reference for others on a swap site as well as my blog.
This is SO incredibly cute!! A sewing project that I might even be able to handle! 🙂 I just stumbled it! 🙂
Thanks Sew much for the step by step.. they are quite helpful… As for a translation…
ma poule = my girl
Petite = small
Cocotte = baby talk, smalltalk
“cot cot codet” is french for the noise made by a chicken… cluck cluck in english…
Hi, I love your apron and just wanted to let you know I included it in a post on my blog at thosecraftysisters.blogspot.com. Thanks, and thanks for sharing your tutorial!
This was a super fun project! Thanks for the tutorial 🙂
https://thelungsofourcity.wordpress.com/2012/11/07/apron/
i am in love with the little ruffle on the bottom edge….super simple, but super cute!
https://patchworkposse.com/blog
I love this pattern – I studied it a lot when working out how to make an apron for a friend, and have now linked to it on my blog – https://alittlebirdmademe.wordpress.com/2013/07/05/27-free-tutorials-and-patterns-for-aprons/
I made this apron! I’m a beginning seamstress. I just learned cloth napkins! And I actually made this apron! It’s pink and it looks like a big layered birthday cake. My son said it looked like something you would buy at the store. Thank you!
This comment has been removed by the author.
I am not sure where you are putting the velcro. Can you clarify? thank you
on this version, the strap around the neck velcros to the apron – it doesn’t tie around the neck. hope that helps!
Is this hand sewn? I don’t see any instructions and the pattern just shows a photo when I click on it. If you are using a machine, how do you do that? There should be more directions.
Is there a link to a full pattern? I checked one of the links but it is just more pictures, not a pattern or instructions.