


I used to have a thread spool holder that I bought at an estate sale – it was small and didn’t hold all that I wanted/needed it to. I looked into buying a holder, but you know how “thrify” I am – I didn’t want to waste valueable crafting funds on a boring thread holder. And then I saw some pegboard at a garage sale and found my solution – make one!
So here we go – a quick tutorial on how to make a thread spool holder – in case you need one, too. First, gather your supplies:
–A piece of pegboard (I got mine for $1 – see the sticker? it says $2 but I talked them down)
–a few dowel rods that will fit in the holes (mine were 1/4 inch dowel rods and I ended up needing about 6)
–saw for cutting
–optional: paint and trim boards
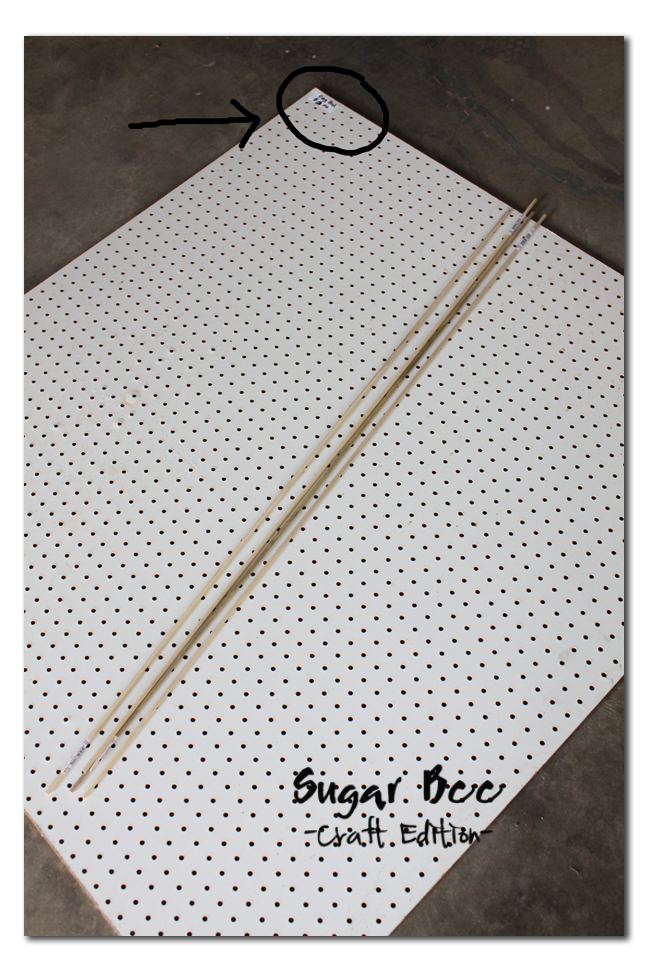
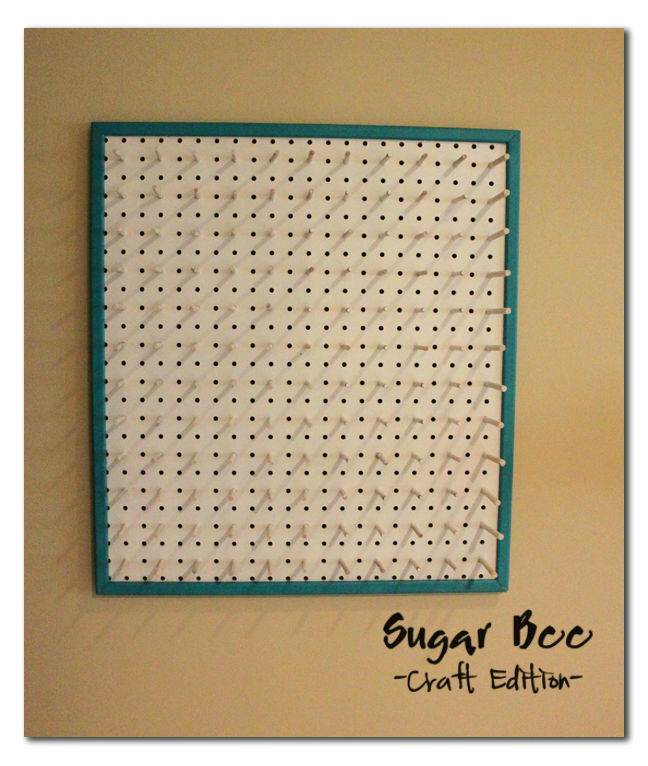
First I had my husband cut my dowel rods in to 2 1/2 inch long pieces (and some longer ones for my serger thread spools) and cut my piece of pegboard because I didn’t need that huge.
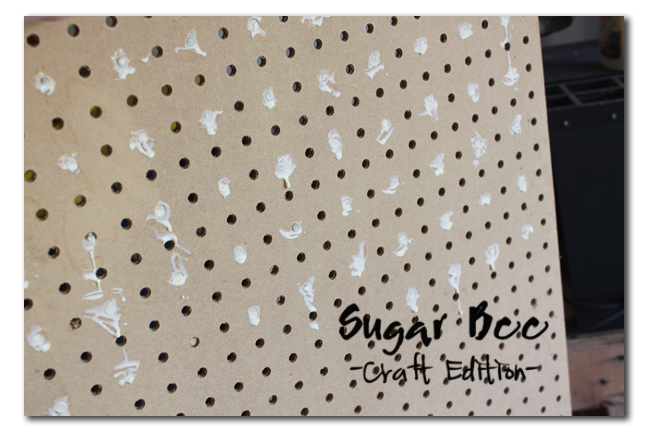
Then coat the end of the sticks with wood glue and shove them in the holes, every other one, as pictured:

They were still kind of wiggly so I coated the back of the hole with glue as well. Afterwards when the glue dried they were really solid – I don’t think the glue on the back was necessary.
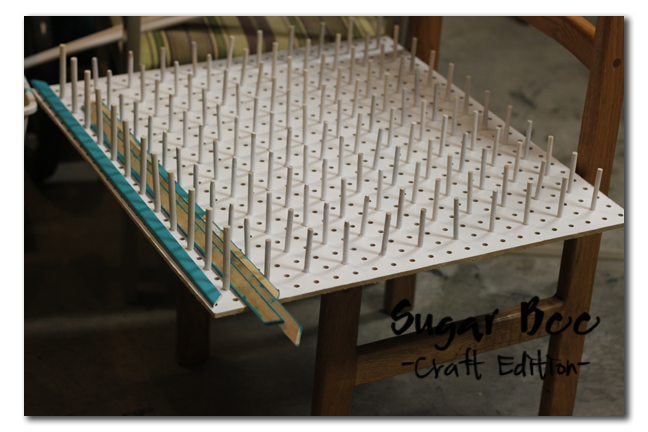
Then after it dried I spraypainted the whole thing white. Meanwhile I had my husband cut some trim boards for it and I painted those as well.
Then I used the same wood glue to attach the trim – very easy. (Look close, you’ll see the line of glue)
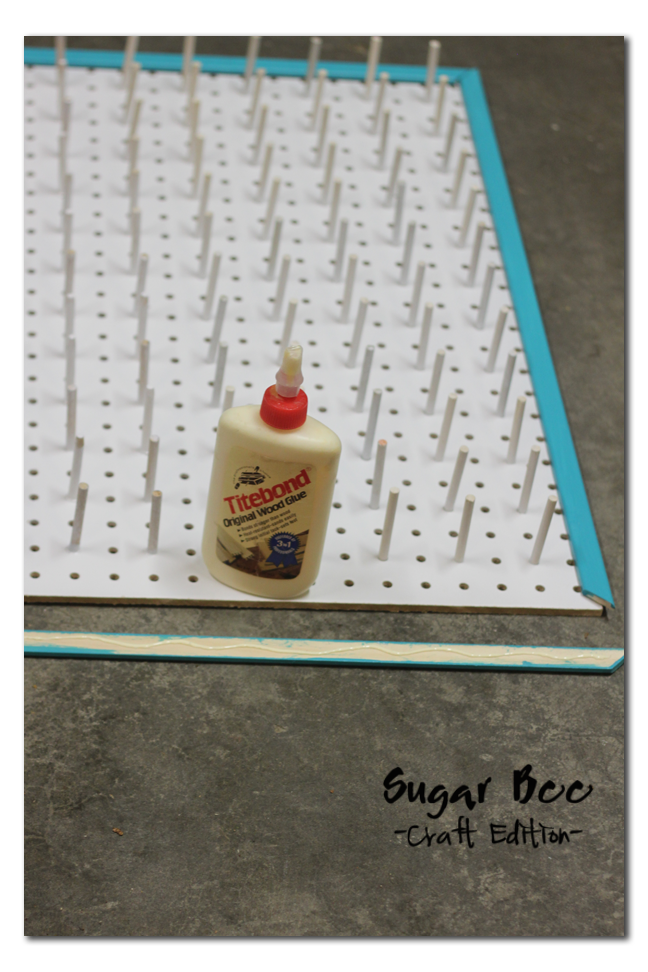
I then clamped it down to hold it while it dried. I’m not sure this was necessary, but I thought it would make a good picture and seem like I knew what I was doing.

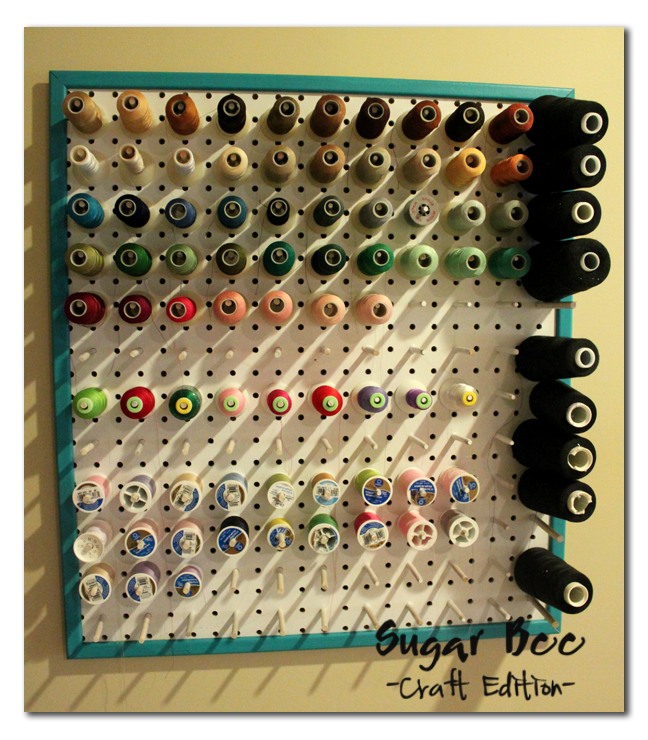
Now, I wish I would have taken my ta-da final pictures outside, but I didn’t, so you get the ones from my poorly-lit craft room – but trust me, it looks GREAT!
I LOVE it – especially the pop of color that the trim gives it. And there’s more than enough room now – looks like I need to buy some more thread…..
Love Video Tutorials?? I have those too!
Great work. I’ve been looking at my pile of spools of thread and have decided I need to do something to organise it. This is just the tutorial I need. Thanks!
That is brilliant – until I found some at a thrift store at a really great price I was the same way – they are waaaaaaaaaaaaaaay to expensive new!!
awesome! great job on this project:)
Looks great, fantastic job!
This is perfect for what I need. Right now I’m using those plastic shoe box containers, and I really can’t see the point in shelling out $25 for one of the ones from Jo-Ann’s or Hancock. Thanks for the tutorial!
I love those! I have always been too cheap to pay 12 bucks for the ones that would never hold enough thread anyways! Now I’ll be on the hunt for peg board!
Great idea! I was just thinking that I needed to get myself something like this. Maybe now I’ll make one!
How clever . . . if only I was that organized!
What a great idea! I have an old frame and a piece of scrap peg board I’ve been saving–now I know what to do with it!
Excellent idea! I have two smaller spool holders now and they aren’t up to my thread collection. Love this! Now, where will I hang it?
Thanks for sharing!
This is GENIUS and I’ll be featuring tonight!
Agreed…GENIUS! I’ve so got to try this. My threads are taking over my studio!!! Thanks for sharing.
WOW! What a great idea!!
Wow, this is impressive! I’m just starting on my sewing journey, but maybe someday I’ll have that much thread! 😉
Thanks for linking up at Sharing Time!
~Heather
I would love to make this someday. Thanks for the great idea Mandy.
Good job! I heard a great tip at the quilt guild meeting the other day: if you make the peg a little longer than the thread spool you can put the bobbin with the same colour thread on top of the spool on the same peg. That way you always have the two together. Not like me searching my messy sewing box for the right bobbin to go with the thread…
That’s brilliant! Thanks for sharing!
WOW!!! you are so creative and talented! I bookmarked this and I can’t wait to make my own!
Love the new thread holder. Reminds me of sitting in your old sewing/laundry room working on embroidery projects.
Oh this is such a fantastic idea!! I’ve been lamenting over not having anywhere decent (and easy to reach) to store my thread, and it just so happens that I have some spare peg board and dowel rods… thanks so much for the inspiration!!
OMG! so cool, and i can’t believe I didn’t think of this! I have a tiny thread holder, and it only holds about half. I am so totally making this!!! Thanks for the idea!!
Great tutorial! I’ve been looking for one of these!
I love this. What I love most (besides the utter frugality of it) is how it holds different sized spools! So handy!
Fabulous! My mother just commented on how I need a better system for my threads…now I can have one. Especially since I have leftover pieces of pegboard from my newest show display piece 🙂 Woo Hoo!!! Thanks for such a great idea!
This has been all over the blogs this morning! Congrats on such a fun idea. I need one of these. 🙂
thank you for linking up to M.M.M.! love this idea…I will be featuring next Monday 🙂
I need one of these. I believe a peg board should be in every room. What a great idea.
I love your board and might just try one myself! I nearly fell off my chair when I got to your snippet at the photo with the clamp. Classic. Too funny. Thanks for the great tut!
happy creations from tj in germany
LOVE this! I’ve been needing one for too long but have held out due to lack of funds. I think I can afford this project though 🙂
Fabulous! Totally Love it. I love handmade projects whether its crafts, food, and anything else!
http://www.livingonhomemade.com
What a great idea! I’d love to try this! All of my thread is in a box now and it always gets tangled. This would keep everything neat and organized. Love it!
I love this idea..cheap also is better.I am going out to the garage right now I have some left over peg board..yahhh
Perfect timing!! I got online to find a good DIY threadholder idea and this is what I found in my RSS feeds right away. That looks so great!
Mandy you are fabulous! I need one of these so bad! My craft room is my summer project, and this will definitely be one project I will do! Thanks for linking it to Hoo’s got talent!
i saw this from Night Owl Crafting, and it caught my eye instantly because the retial racks are sooo expensive it’s insane. Thank you for sharing if I can pull the hubs away from the other 50 things I’ve requested of him hopefully I can have one of these done by the summer!
I love this! I just bought a new thread organizer, but I think I like this idea better – nice for them to be in full view 🙂 I think I even have some pegboard already! YEAH!
Thanks for linking at Lucky Star Lane!
This is super creative! I love it! Thanks so much for linking with PonyTails and FishScales!
Dang! Why didn’t I think of that? This will have to go on the list! Man!!
Very creative and thrifty! Visiting from Somewhat Simple party.
Thank you SO much for linking up today!!!
THis is a great idea! you are so smart! 🙂
i’m in awe over the amount of thread you have 🙂 sooo fun! thanks for sharing at my saturday soiree
I really want to make one of these for my mom.
It’s thrifty,decorative AND useful. You hit the trifecta there!
Such a great idea, I love how it turned out! Thanks for the tip about gluing. 🙂
What a great idea! I wish I would have seen this before I purchased a thread holder! 🙂
Great tutorial! I just featured it on Everything Etsy! 🙂
~Kim
I need one of these. What a thrifty idea. I featured you as part of ‘Look at me, I’m SO Crafty!’ Party at Fun to Craft. Thanks for linking up. Come by and snag a featured button!!
this is such a clever project. I love it!
Thanks so much for linking up to the CSI Project! We really appreciate it. I hope you will come back next week for our Hardware Store challenge!
XOXO
Jen
Thank you for this good idea.
Mandy, thank you sooo much!! I have been looking for a one piece thread organizer (I have more than 500 spools of thread) to organize my sewing thread and serger thread. I went to home depot with your directions and if no one can find the pegboard for $1 they have a piece already cut into 2×4 which is perfect for all my thread!! Thanks so much again for your awesome idea!!! You have saved the untidy mess in my sewing room!
Fabulous!! I’ve been wanting to make a thread organizer! Thank you for this tutorial, I just bookmarked your page! 🙂
Add me to the list of people who think this is wonderful! :>) I finally found a holder at a garage sale, but it doesn’t nearly hold all my spools. (I also love to pick up thread at rummage sales and thrift shops and whatnot, so it adds up quickly.) We also have some pegboard out in the garage that is calling my name…
I also like the idea of making the dowel a bit longer and adding the bobbin – I was also thinking of putting some sort of shims (feet?) at the bottom, between the board and the wall so it tilts a bit. Gravity has a tendency to work against me at times.
Anyway. I linked to this on my weekly roundup last week – thanks so much for sharing!
Your fabulous thread rack was featured on Five On Friday…Top 5 Hits. Come check us out!
https://singingwithbirds.blogspot.com
Wonderful! Now to go grab that piece of pegboard that is to go into the trash…fast!
Your timing couldn’t be better! Thanks so much for sharing. It looks great. Well done.
Thank you for this thorough tutorial. I made one for myself using it.
Elisabeth
EXCELLENT idea! Thanks so much!
Got pointed here by TipNut. Thank you – a brilliant idea.
One thing. My man services the commercial embroidery industry, and one of the things he recommends to his client is that threads are stored away from light & dust: they get brittle. So maybe an old cake cover or something? Just a thought.
Thank you again, Tessa
HI. EXCELLENT WORK. LAST YEAR I MADE SOMETHING LIKE THAT, BUT I USED A FRAME FROM AN OLD AND DAMAGED PAINTING AND ATTACH THE PEG BOARD IN THE BACK AND USED TOO THE DOWEL RODS. MIRIAM.
HI Mandy, Thank you so much, I have been trying to decide how to make something for my jewelry. This would be perfect to space the dowls a little futher apart. I will be amking jewelry and need lots of space. Thank you so much, you are wonderful.
Linda
Génial, je sens que dès que mon atelier est terminé, je le fais…. avec un couvercle en plexi pour éviter la poussière, car la couture en génère beaucoup!
I just found my peg board on the side of the road. Yep, I dumpster dive. 🙂 Then I spent $2 on dowel rods. I painted the peg board hot pink from a sample paint I received in the mail and am painting the dowels black. Should be cute!! 🙂
Just letting you know that I made this and linked back to your tutorial – thanks again for sharing this marvellous idea
https://letsgoflyakiteuptothehighestheight.blogspot.com/2010/07/thread-holder.html
Great idea. And the tutorial is so clear and informative. I am going to make one of these. Thanks for sharing.
I almost bought one of those overpriced ones at JoAnns the other day but knew there would be a better solution out there. THANK YOU!
Liz
Great Idea! I might have to make one of these. I found you on Trendy Treehouse Creative Share.
https://spottedsmiles.blogspot.com
great tutorial – I linked to it on my blog here
https://mytwobutterflies.blogspot.com/2010/08/weekend-organizing.html
thanks!!
Awesome. This is exactly what I need for my craft room!!!
I have to piggyback on what Ansie already mentioned… I’ve been thinking that I knew that someone had to think of this before but I can’t believe they aren’t out on the market. Make the peg a little longer and keep bobbins matched up the their thread color! Thanks for the step by step idea!
I love it. I own thread, have inherited thread — from 3 people!, am basically swimming in thread. This idea goes straight to my husband The Builder.
I LOVE this idea! I just wrapped up making over my sewing room this will be the perfect finishing touch! And I knew I’d find something to do with that pegboard I’ve been holding onto. Thanks for the great ideas.
~Ilsa
Hey! in Noob here but i just wanne know is anyone hear about [url=https://strony.pozycjonowanie.ws]tworzenie stron joomla[/url]?
are they good?
ok iv been reading this forum for a long time but posting just now to show you something i found. If you play poker go to pokermeg.com and get their code for poker (i personally played full tilt) put in money, get bonus and cash out. takes few hourses and i lost 100 but made 600 so walked with 500
how many posts do i need before i can send pm?
What a great idea! I’m also way to frugal to pay for the crappy ones at the craft stores. Thanks for sharing!
(I’m a new follower and over from the Pink Hippo Party at Pinkapotamus.)
This is wonderful. Great tutorial. I featured this in a post that goes live tonight at midnight. Thanks for sharing! https://untilwednesdaycalls.blogspot.com/
OMG! Thank you so much for the tutorial!! I just bought some bobbin mates (which attaches the bobbin to the spool so you know which ones go together) and wanted to make a spool holder (not paying retail for something like that) and then I came across your post. U ROCK!! Thanks so much!!
Yay! I have been looking for a solution to my thread nightmare! Thanks!
This is such a great idea! Thanks for sharing it with us.
Yeeeehaaah! Such a clever and easy solution. This will be my weekend project. I’ll try attaching metal door hangers on the back of the board so it may hang on inside of closet door. Thank you!
I have mega-love for this project, thanks so much for sharing! I managed to nab a decent thread box during a Joann’s sale for super cheap, but it’s just NOT BIG ENOUGH. This could be the answer to all of my problems!
Oooh I really like this idea, and I don’t even sew. haha. Not yet anyway. 🙂 Is it weird that I would like the thread holder as a piece of art too? Like all different shades of blue, or green all on one board. Anyway, thanks for sharing this week. 🙂
Okay Mandy! Help me here, I did everything just fine with this, but I can’t spray paint it! Was your peg board already white when you bought it? Because I bought the peg board at Lowes and it’s brown, well apparently it has to be primed first, LOL…*doh moment* I’m going to get some primer and see if that does the trick tonight. Maybe you might want to mention that in your tut for others like me 🙂
just found your blog – loved loved loved this idea for threads – I counted over 175 in my room…. so after showing this simple board to my hubby it was off to Home Depot and just a few hours later! waa laa = a new wall with ALL my threads in one UNMESSY, colorful place. Mine is 2 feet by 4 feet and with the little extra space I added hooks for my scissors,and other sewing room essentials!
Thanks a million!
Debi
Thanks for the great tutorial on making a thread holder. My husband bought be a huge lot of thread that is in it’s own board at Joann’s for Christmas last year. The way it is held there is no place to put your bobbins with the thread and I have been trying to think of a way to store them with the correct color. This is perfect as long as I cut my pegs long enough to put the bobbins right on the end of the dowel behind the thread spools. I am THRILLED! Thanks again.
This is awesome. I need one of these and I think I’ll make my mom one too. Great tutorial:)
love this idea, I’m going to give it ago this weekend, I know this is an old post but i wondering how do you keep the strings from unraveling
As long as I put it back on wound-up, it’s usually okay and stays put – until a kiddo comes along…
I am so excited to try this for my studio!! I am planning to go get the supplies and start it tomorrow! =) Thank you for sharing!
Thank you so much for sharing… The raks are to expencive here in Denmark… I will deffinetly try to make my own ..
Thank you
Lisa
This is great, but you didn’t say how to hang it up? Is it screwed directly to the wall? Is it on some sort of picture hanger thing? I need to make a huge one & am concerned that the weight of the spools will be too much for the structure. Thanks
mine is on those picture hanger things that are bent and made to hold heavy items – I just hook it using the holes in the thread rack. Hope that helps!
I love this! Thank you so much for sharing!
What size did your final square end up being? And how did you hang it up on the wall?
Thank you,
Tessa
Oops, sorry. I just read the post where you said you used a picture hanger to hang it. I’m still curious as to what size your pegboard is. Thanks!
Tessa
it’s about 2 feet by 2.5 feet, and I kinda wish it was bigger 😉
I really like that peg board. Thinkni will try it only thing is I’m not to fancying how the serger thread looks so probably where I want to put serger thread I’ll put more space between. Other that I love it great idea and I’m also adding a piece to the bottom so that it’s slanted instead of straight to prevent threads from falling off.💜
Great idea and amazing job! Thumbs up👍🏼, Women can do anything!!