


So, I thought of this idea for the contest and made it (with Kate’s help rolling rosettes and picking leaves off tall trees – thanks for that!) and wrote the post all in one day – phew! The theme was “natural”.

There is nothing more “natural” in the fall those those gorgeous leaves. I LOVE the bright red ones especially, so I used them to make a wreath. That’s right, the rosettes in the wreath are made from folded and wrapped leaves!!

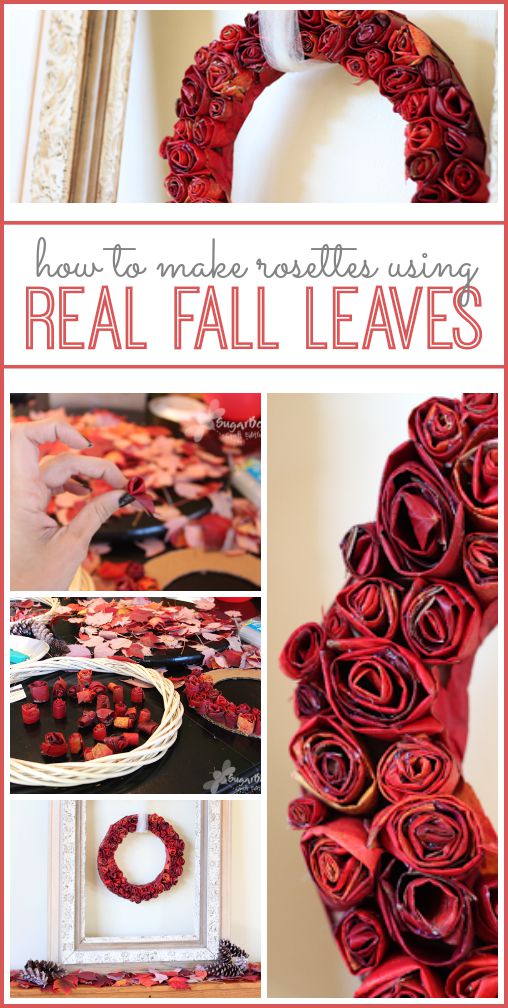
Here’s an upclose view of the leaves turned into rosettes – WOW, right?!

I tied the wreath around a frame I already had and set it on my piano with some more leaves and pine cones.

This whole Leaf Rosette Wreath project cost me nothing – love that! I also love that it is RED, so I think this can transition easy into holiday decor.
So, would you like a brief how-to??
First, collect the leaves – they need to be pliable (err, “bendy”) so I pulled them right off the tree. Then cut a circle wreath form out of a discarded box – I had purchased wreath forms that were twisty, but they weren’t going to work – the cardboard was perfect.

For the leaf rosettes, fold them in half along the stem, like shown ( just ignore my post-halloween-flaking-nailpolish):

Then cut the stem off and roll it up. Put a dab of hot glue. Then fold and wrap another leaf around the outside. Most the bigger rosettes had 4-5 leaves. The small tight rosettes had 2-3 leaves. After it’s the size you want, use scissors to even up the bottom of the rosette.

As you roll leaf rosettes you’ll find that you can make different “varieties” – loose, big, tight, etc. All are great and add variety to the wreath.
To attach the rosettes to the wreath form, just use a generous amount of hot glue. I did not cover my wreath form first, but I wish I would have – so I’d recommend gluing down a layer of flat leaves to start, that way there’s no risk in seeing cardboard. For my edges I wrapped leaves around and glued them like so, to hide the cardboard:

And that’s it! I hung mine using a strip of tulle in an empty frame – but you could do anything with it – think of laying it flat on a table with a centerpiece of candles in the middle…
Thanks! – – Mandy
Beautiful! Thanks for sharing!
Very unique! I love the coloring of the leaves. Fabulous project!
LOVE this!! I believe my kids and i are going on a leaf hunt today!!
This is COMPLETELY awesome!! You are the greatest!!
Incredible!!
that is so pretty and vivacious, not to mention a clever use of leaves! i think it’s awesome Mandy!
Unbelievable! Beautiful. Linking love thru Keeping it Simple. New Follower! Come visit me if you can! Blessings,
Denise
That’s so pretty! I never would have thought to do that with leaves. Thank you for sharing!
What a beautiful idea! I love it:) I’ve brought in leaves for other projects, but never thought of this…great idea!
I saw this on So You Think You’re Crafty and had to come over and see…
Absolutely amazing. I can’t believe that it’s made out of leaves! What a brilliant idea. :]
Very unique. Love it!
I love this. I have an empty frame in a bathroom that I can hang this from. Super cute.
Beautiful! I love this! I am featuring this at somedaycrafts.blogspot.com.
This is such a brilliant idea! I love that it’s free, it incorporates all those lovely leaves, and it appears to be easy…perfect!
I am so in love with this!! As soon as I saw it on SYTYC I put a link to it on my “to-do” blog list. I live in New England, and this is such an amazing way to utilize the gorgeous leaves. I am SO glad you posted this tutorial, because I wasnt quite sure how you did the rolling.
So, do you think this wreath will last you only one season? Or do you plan on keeping it for years?
Thanks again!
Lindsay
Ooooooo! Looky there! I had thought I had seen everything….golly was I wrong. This is too cool!
CONGRATS!!!!!!!!!!!!!
I love this idea! I love the leaf colors. Where I live most of the leaves have died before really changing this year 🙁 maybe next year I can make this. Thanks for sharing!
This is gorgeous! I am amazed at the time that you must have put into making rosettes out of leaves! Love it! Hope you link it up to my Pink Hippo party @ https://pinkapotamus.blogspot.com/2010/11/pink-hippo-party-3.html
Amazing! How many hours did this take? You are incredibly creative and PATIENT~
Wow! So cool- Will it keep for next year? Did you spray it to look glossy like that?
Really great! I love that you gave it a red twist!
love it love it LOVE IT!!!
I made leaf roses earlier in the fall and just knew they’d look great as a wreath. Glad to see I was right! Beautiful.
I love, love, love this! I wish there were still leaves here in Minnesota. Definatly going to try this next year.
This is such an amazing idea!!!
I am in love with it! IT’S BRILLIANT!!!
Mucho love from Nichelle @
https://vintagewannabee.blogspot.com/
you totally got my sytyc vote on this one! great job!
That is ingenious!
Love this, it’s gorgeous!
This is a truly unique way to blend two generic ideas. Its amazing! Perfect for Thanksgiving and Christmas!
http://www.uvinyl.com
http://www.uvinyl.blogspot.com
Gorgeous! The wreath is perfect!
That’s beautiful! What a great idea, I just wish I had LEAVES where I live (NM)…I’ll have to figure out how to make on with yucca pods!
That is so pretty. Did you know that if you press leaves in glossy magazines the ink will preserve them so that they are dry and flexible?
Oh my word woman! That is such a fantastic idea!!! It looks beautiful!! You’re setting the bar pretty dang high:)
Thanks so much for entering!
Andy
http://www.poppiesatplay.blogspot.com
So romantic and beautiful! How are the leaves holding up?
Mrs. Petrie @ casapetrie.com
Hey Mandy, just wanted to let you know I FEATURED your beautiful wreath today. I simply adore it, and so wish I could have made one, but all the leaves are yucky brown now.
Thank you so much for linking to **Amaze me August**, and I really hope you share more wonderful projects with my readers soon. 🙂
Come grab yourself a button girl, and display it proudly:)
Bella 🙂
Absolutely beautiful! I saw you featured over at Bella Before and After. Great job!
How in the world? Even after seeing how you did this, I still am in awe! Now that is what I call super creative!
Those leaves were already so pretty and you made them look even better. Wow!
stunning and original! I love this!
I love this. Do you think the leaves will turn brown?I guess it would be fun to find out!
I’ve had it for a couple of years now – still great! The leaves are darker, but still red. Definitely crunchy, but as long as you don’t touch them, they hold up.
Gorgeous! Pinned & totally making this!
I’d like to invite you to join us at the Clever Chicks Blog Hop this week!
https://www.the-chicken-chick.com/2012/10/clever-chicks-blog-hop-5-happy-hen.html
I hope to see you there!
Cheers!
Kathy
The Chicken Chick
I LOVE THIS! My daughter loves collecting leaves in the fall and this is a great way to display the leaves that she finds!!
Lovely! Thanks so much, I featured it on my blog: https://www.colorfulcanary.com/2015/10/14-fabulous-things-to-do-with-fall.html
Colorful canary recently posted…14 Fabulous Things To Do With Fall Maple Leaves