


You can be jealous – my nightstands are amazing!! I am so thrilled with how they turned out – what I saw in my mind actually came into reality. And I’m here with a quick tutorial for you of how to make nightstands from a desk. It’s a perfect DIY, Do-It-Yourself project to tackle on a weekend.
UPDATE: we’ve had these for years now and I STILL love them!!
Master Bedroom Pop of Color
I really love the pop of color they bring to that whole wall . My wall stencil can be seen here and the ceiling inset dilemma can be seen here.

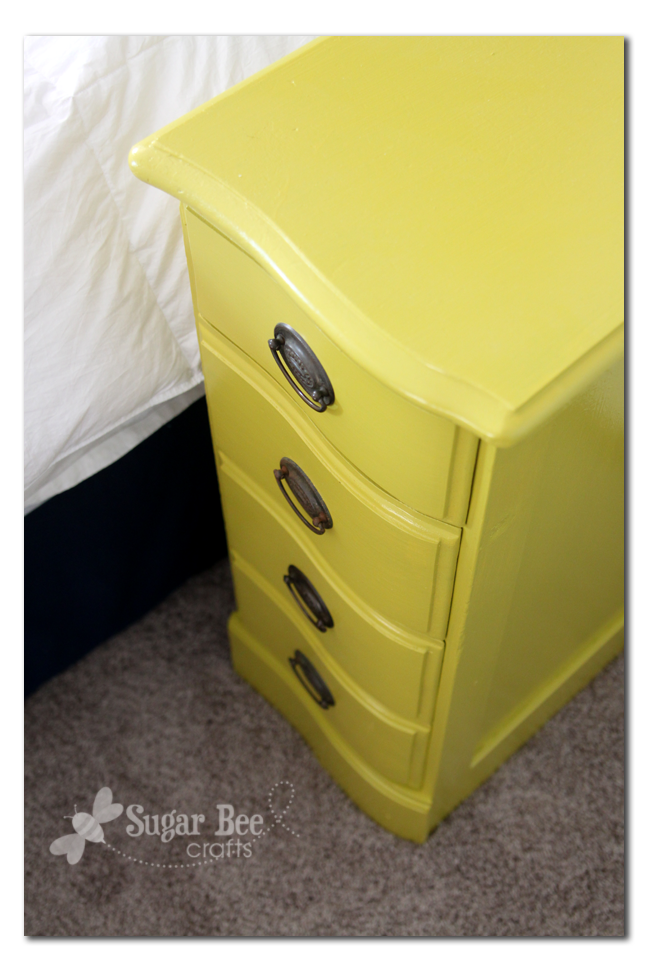
They bring color to the room, but also extra depth and dimension. I love the all the drawers and the unique curve that they have:

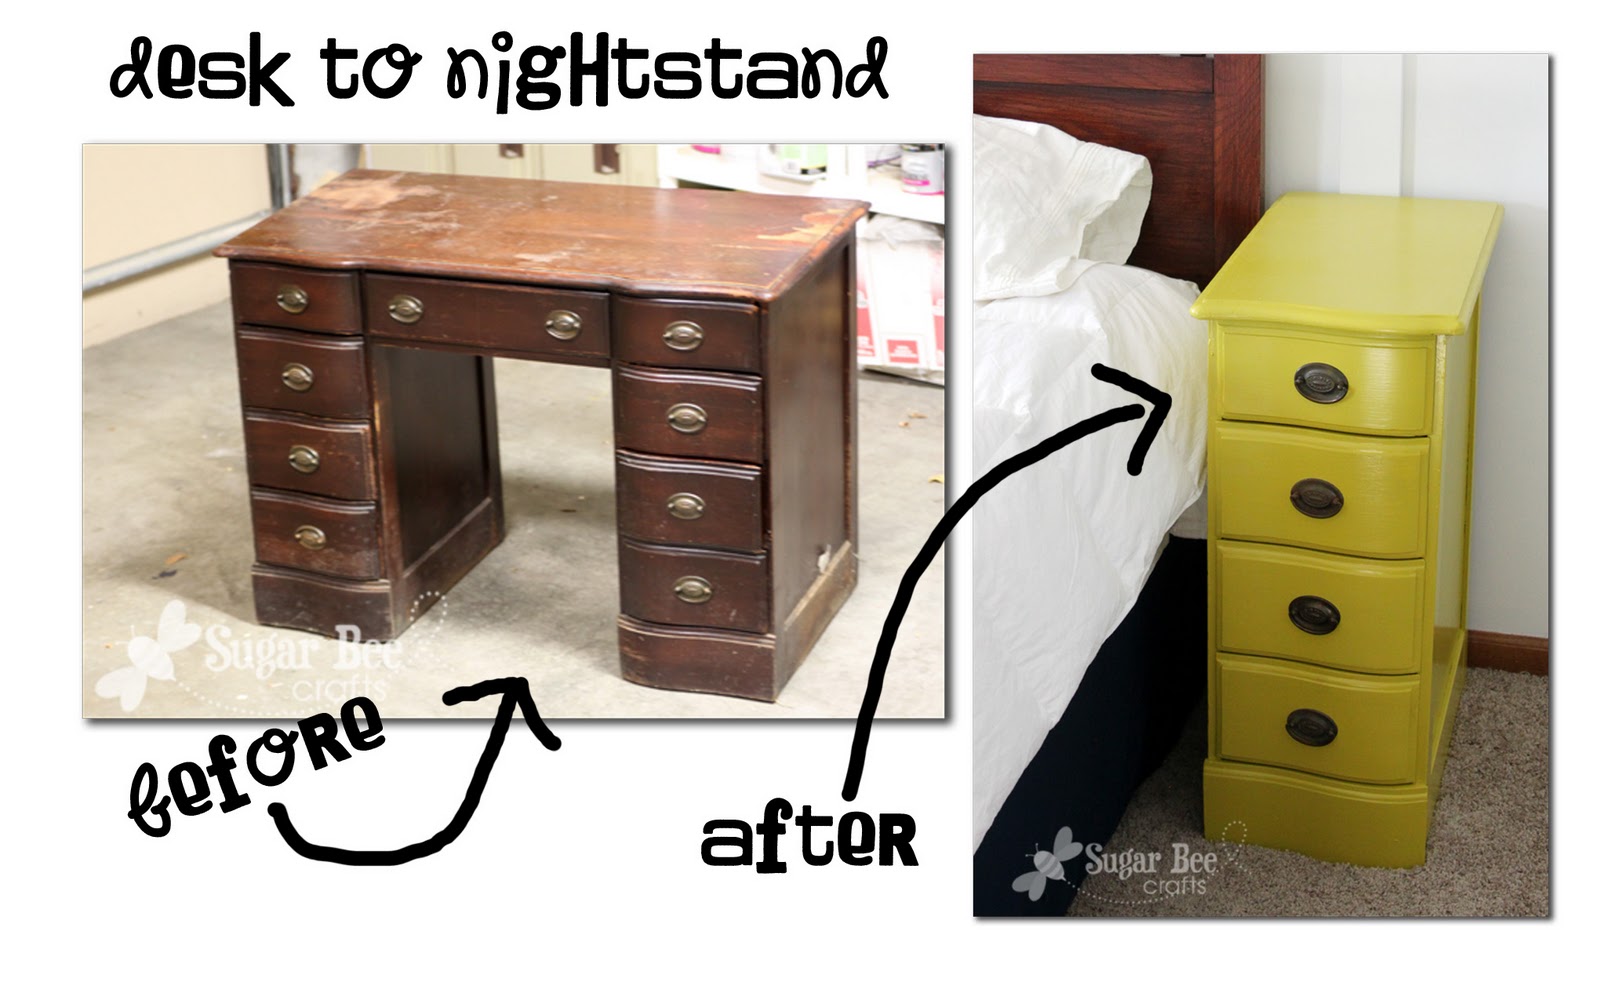
Nightstands from a Desk
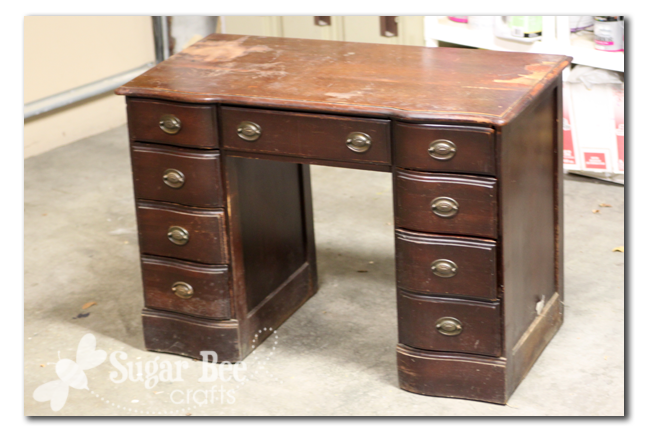
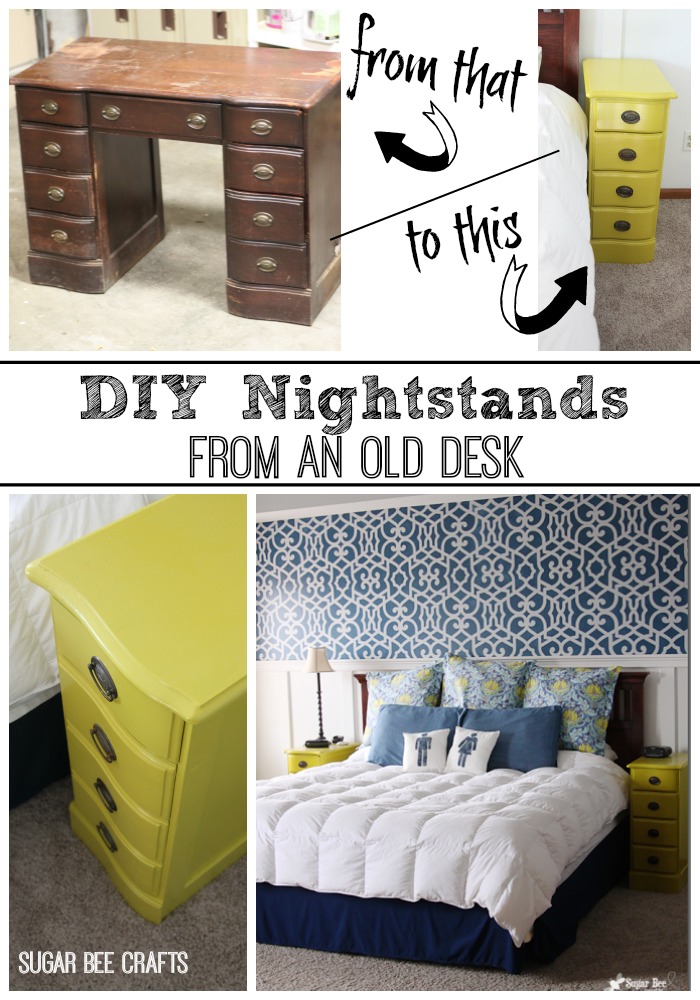
So yep, these came from a desk – seriously!! I can’t take credit for the idea – my sister-in-law said she was chopping up a desk to convert it to nightstands, and I thought it was genius. So I started haunting Craigslist for a cheap desk. I found it, solid wood – for $10 – awesome!! The top was a little rough, but that’s part of the charm, right? And that’s why I didn’t feel bad about cutting it – it was in pretty rough shape.
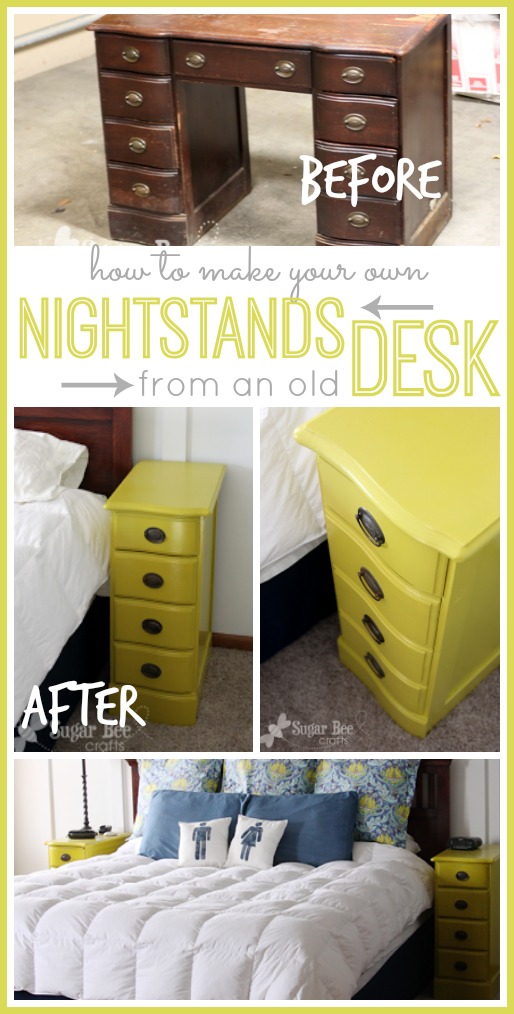
How to Make Nightstands From a Desk
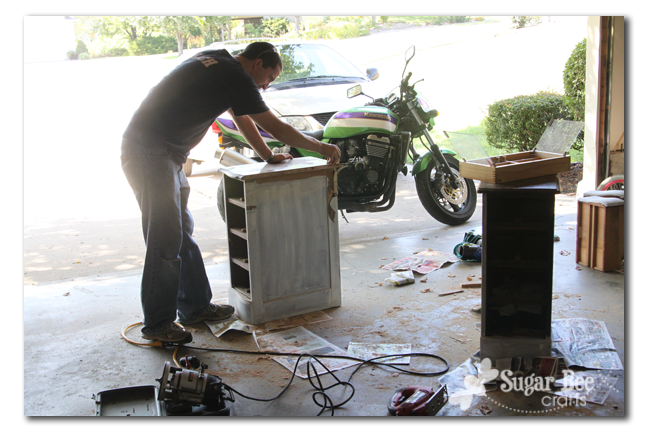
Cut the desk in Half
I enlisted Trevor’s help. He cut free each stack of drawers from the middle part. Aren’t I nice to showcase his new motorcyle 🙂
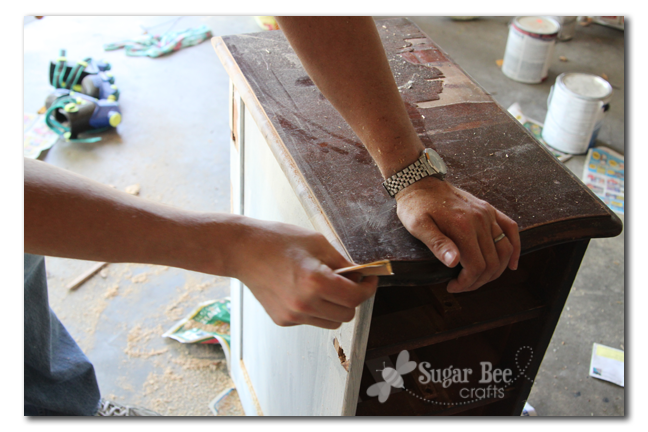
Then he routered the cut edge to make it match the manufactured edge and sanded it smooth.
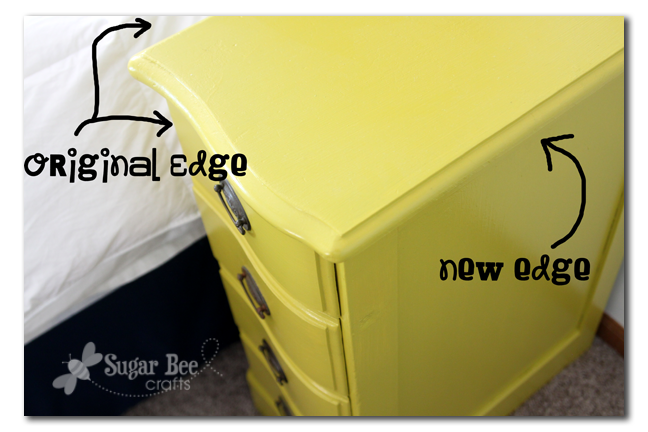
After painting and putting them in our room, I had to ask him which edge he did – so obviously he did a great job, since I can’t even tell:
Finishing Touches on Nightstands
I primed and painted everything. The color is green even though it looks yellow. Trevor calls it yellow. But I wanted green – and the paint is called “gecko” – who has ever heard of a yellow gecko? So I call it green. I actually liked the drawer pulls it came with, so I just soaked them in mineral spirits overnight and scrubbed on them with a toothbrush to clean the up a little, then put them back on:

And voila, in their place – they’re looking great and I LOVE all the drawers:
You can do this!!
Another Desk Turned into Nightstands
Find an old desk and get to work. Kate found a desk on the side of the road and made herself some. Here’s hers –
BEFORE:

AFTER:

So there ya go – a quick run-down of how to make nightstands from a desk. Start your hunt for the perfect desk and go ahead and get started!

What a good idea! I love how they turned out.
Wow, they look fabulous, I love them! What a neat idea too! I am jealous you found that wood desk for only $10 on CL. I’ve been looking for a desk just like that for so long and if there is one, it’s too expensive. Sigh, that’s how it is with CL though. I won’t give up! 🙂
SO awesome! I absolutely love this idea. Yours turned out AMAZING. I love the color and your stencil wall is great. I love that color combo. Thanks so much for sharing!
WOW, what a great idea! They turned out beautiful. I would love for you to share this idea on my link party at cookienut.blogspot.com.
Wow! great idea. Your pics just make me want to re-do my room asap!! 🙂
Those are fabulous!!! This is exactly what I have been looking for! I have had so much trouble finding the right nightstands for our master bedroom. They have to be pretty skinny because we have closet doors on both sides of the bed that don’t leave much space when they are open. Thank you so much!! I’m off to Craigslist to look for a desk!
this is AHHHH-mazin’!! talk about taking a risk and having it pay off!! and i love your bedroom wall,too…the yellow is the perfect complement!
amy
…after checking out your cool blog, i’m your newest follower!
amy
I just featured this amazing project today! Come grab a button
Kim
https://kim-toomuchtimeonmyhands.blogspot.com/2011/10/good-morning-sunshine.html
They came out great. I love the color too.
Um, this is genius, Mandy! And what a fun color, too! 😉
Fantastic! I love this! Sharing this on my facebook wall!
I love the green (it shows up sort of a pear color on my screen?) – that is brilliant to cut them apart. If you hadn’t pointed it out, I don’t think I could have figured out the new edge.
Wow — so creative!!!!
totally brilliant! just another thing for me to stalk CL for 🙂 Pinning this for the future 🙂
What an awesome hubby you have!! I’ve had some pallets in the basement for MONTHS trying to get my hubby to help me with them and…they are still there! I think my guy and yours need to have a talk! lol The tables look great!
Smart. It’s hard to find cheap matching nightstands. Never thought to look for a desk. Thanks!
What a fantastic idea. I could use some more drawers. Hubby has the matching nightstand to our bed while I have my mom’s antique treadle sewing machine on my side of the bed. (Yes, it has drawers – but you know how tiny they are.)
That is the best idea ever! I need two nightstands with drawers and they don’t exist!
That is a GREAT idea!!! I have been looking for nightstands for months! Never would’ve thought of this! Now to find an old desk! Yours look AMAZING by the way!!!
Great idea and great colors!!
BRILLIANT!! This is one of the BEST re-purposing ideas I’ve seen! Can I say it again – BRILLIANT!!
Now, plop it into a kids room and you can link up on Tuesday’s nursery! 😉
Can I be you when I grow up? that is amazing, I just love this idea! Now you need to find something brilliant to do with drawer…. I am sure YOU will!
Carlee
http://www.ladybirdln.com
Awesome! I need to find a desk like this so I can do the same thing!
FABULOUS!! great idea. i see alot of desks and very few side tables or desks.
so clever.
Love it.
Found you via showmewhatyagot and hope you’ll swing by! I have a great giveaway today:
https://hellolovelyinc.blogspot.com/2011/10/more-stencil-splendor-giveaway.html
best to you.
michele
this looks great! i actually did the opposite. i found two old nightstands at my local goodwill and i had an old window frame i put between the two. voila! but i have been wanting some new nightstands…
This is amazing!!! Great job!
Wow, your nightstands are fabulous. I love the color you chose as well. What an inspiring project!
Shauna
myshaenoel.blogspot.com
Fabulous idea! It looks great! I’ll now have to look at items at the thrift store in a whole new way!
This is awesome. I’m linking up at Decor Hacks on Saturday. Also, I want my room to look like yours!!
First, I have to say I absolutely loved this and was blown away when I saw it. Then, this evening, my husband asks me, “Have you ever heard of the blog Sugar Bee Crafts?” I say yes, I’m a follower. He says, “Well, they were featured on Life Hacker today for a desk turned night stand. That’s a big deal. Life Hacker is huge.” He was impressed by your project and by getting featured on Life Hacker. So I had to come by and say congratulations!!!!
Awesome idea! I really wanna try that. We need new/any nightstands. My husband thinks I can’t do the edges though. I’m sure I can come up with something…;)
everydaygameplan.net
Brilliant!
Mandy,
I am blown away! This has got to be the coolest re-purpose ever!! Seriously … absolutely incredible.
very very fun!!! I am LOVING the colors in your bedroom, and the desk is pretty amazing;) I just read your bio page, I didn’t know you were in KC–fun! So many in Utah…;)
So clever! Now I am on the hunt for an old desk. 🙂
Wow, Mandy! I love this upcycle!!
You were featured on {Crazy Blessed Love} Friday Features!
Come grab a button 🙂
what a transformation!! great pop of color and great price for nightstands 🙂
saw you on the idea room link up.
Get out! This is the best thing I have seen in forever!! Love. =)
I think you ruined a perfectly good desk! It might have had a great history but now it’s yellow and plastic looking! Even though that’s my humble opinion I am sure I’ll be censored and deleted! =D
Wow, that last comment was uncalled for. Now to mine…
Incredible! Thanks for sharing! I’m heading straight to craigslist now to check out the goods.
Boy…Boo to digitalsushi 🙁 It’s the whole point of repurposing something. Sheesh.
I think this is completely clever! I *love* it *:)*
This comment has been removed by the author.
Hi Mandy! Skaie (sky) Knox here…I’m the editor-in-chief blogger for DiggersList, a home-improvement/decor marketplace. Thank you for this fantastic repurposing/before & after project! I will be featuring an excerpt in our DiggersList’s blog that will be published Thursday, February 23nd. Please visit us as well for other fun finds for home improvement stuff! Thanks again!
Love this idea. One other thing you could do – you could take the center section, presuming it had a large drawer in the middle, sand it, paint it etc and put wheels on the bottom. Then use that as a small under bed storage unit too.
Tell Trevor to check out ZRXOA.org. Best bike forum ever for the Kawi ZRX that he has.
What a Fabulous idea! Now I want to do it too! with the blue set is that scrapbooking paper mod pegged on the drawer? I love it! If not let me know what you did! Thanks!
Wow, awesome idea and awesome turnout! I have a desk that would be perfect for this.. I was just wondering how freed the sides from the center part of the desk? Did he make a cut down the middle and pull the shelf, in halves, away from the sides? Just wondering how to do this so I don’t screw it up! Thanks!
I should have taken pictures of the cutting part. He removed the middle drawer completely, then made 2 cuts in the top of the desk, one on each right next to the stack of the drawers. Hope that helps.
Such a fabulous idea I can hardly stand it! They look wonderful and open up so many possibilities, not only as night stands but for those oddly shaped spots that need a smaller furniture piece.You could even stack them, right??!! Thanks so much for sharing!
I saw on Pinterest a great idea for that middle drawer. use it as the bottom of a shadow box coffee table. Either make a frame for it – or – find an old window that fits its opening. Put hinges on the top of the window, add neat legs and a drawer pull on the window and voila! Coffee table to showcase your beloved vintage items… I have my greaet granma’s tatting sammpler book she created as a child. From around 1881-4.
Thanks for posting. What a great idea! I think I know someone who could help with the machinery part of this for me. 🙂 I am impressed with the creativity! Pass on the kudos to your friend too! Also I will say, since I didn’t see the thought mentioned anywhere else in the comments — forget sewing that pillow — fabric wraps on pillows are in, especially on pinterest! 🙂 I think it looks fun and refreshing! Blessings!
SO clever! Plus the nightstands came out gorgeous! Saw them on Pinterest. xo caroline
this is super, simple ideas but very interesting. thank you for sharing with us your great ideas
Love it.
This comment has been removed by the author.
So weird….I did the exact same thing….and the desk looks to be exactly the same as mine! I was drawn to the picture of the nightstands being that I hadn’t painted or stained mine yet! I guess great minds think alike! Lol I had wished that we had taken pictures alng the way to describe what we had done….but now I can refer to your page….great job!
That was such a brilliant idea and it turned out so beautifully! I love the color you chose just perfect for your room! Great job Mandy!
The top one was actually rather nice. Great job ruining it, instead of restoring it.
So awesome! I have a question. The top of the night stand was all chipped in the picture of your husband sanding the edge. I was just wondering if you first chipped off the top layer on the whole top piece or if you just had to sand it.
Great question Jill – – I ended up filling in the grooves of the chips with wood putty filler stuff. It took a lot. Then I sanded it down when that dried. It’s not perfect, but it works!
I’m new to tools and carpentry. What kind of saw did you use to cut the pieces apart? I don’t have a router to bevel the edges to match. Any suggestions? Excited to get to work on it!
I think we just used a circular saw, but I’m sure several different types or even a saws all would work. To bevel the edge, maybe borrow a router from someone?? Good luck with the project!
Hi Mandy. I have enjoyed wandering around your blog and checking out your projects. I especially liked the night stand from a desk project. Pretty cool. I will be joining you in your Project Crochet this month. I was looking for a way to subscribe to your site. Did I miss it?
many years ago i bought a bedroom suite that included a dresser with a stack of drawers on each side with a full cheval mirror and a low shelf in the middle.
when i moved years later my husband and i simply chopped out the supporting posts, stained the ‘raw’ wood to match the walnut and made two really functional cabinets not a million miles different to yours.
Wow what a great idea. Love it and the color looks nice on it.
Wow, this is pretty nifty! Such an incredible transformation; and I love the bold color!
Seriously Mandy? These are so unique, gorgeous, and FUN! I love everything about them! I now have a new focus for my yard sale searches! Thank you! Melanie 🙂
That looks beautiful! How much does Trevor charge? : )
How did you get the old veneer off of the top? I love the idea and am ready to cut my desk in half!!
M recently posted…my new obsession… WIWW for FREE
It’s still on there – I filled in a few cracks with putty then just painted over it – – good luck with yours!
LOVE this clever idea but would like to know how your hubby cut them free? What tools specifically? Thank you!
I think he just used a circular saw. Great question!
Do you think that a particle board desk would work to do this too? I have one I have been wanting to get rid of bc it is just too big but the ends would work well for night stands.
I think it’s worth trying – if you’re just going to get rid of it anyways, you don’t have much to loose if it doesn’t work out. Good luck!!
The idea you have been put forward is great one
That looks beautiful! How much does Trevor charge
It may be a long shot to ask a question about the desk repurposed into night stands after so much time had passed since the posting but here goes: what are the measurements of the night stand bases? Are they stable? I have a similar desk, would love to make into night stands but am worried they would fall over.
we actually still have the nightstands, they’ve held up great and are very stable and have never fallen over. Great question!
It looks amazing, thanks for this article!
Crazy question…… do you happen to have the two knobs from the desk that were not used? I just bought a desk turned nightstands from someone and I’m pretty sure those are the SMAE knobs. My night stand is just missing one 😩