


this post may contain affiliate links
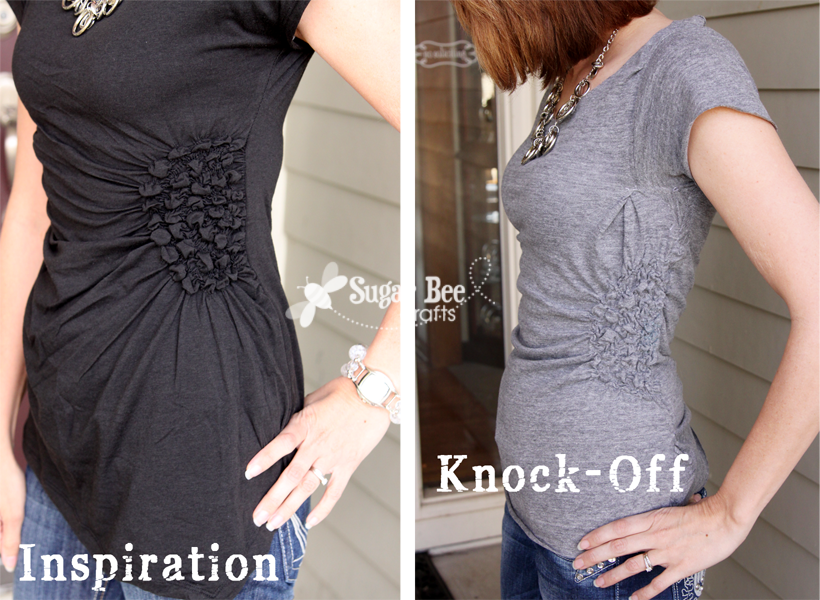

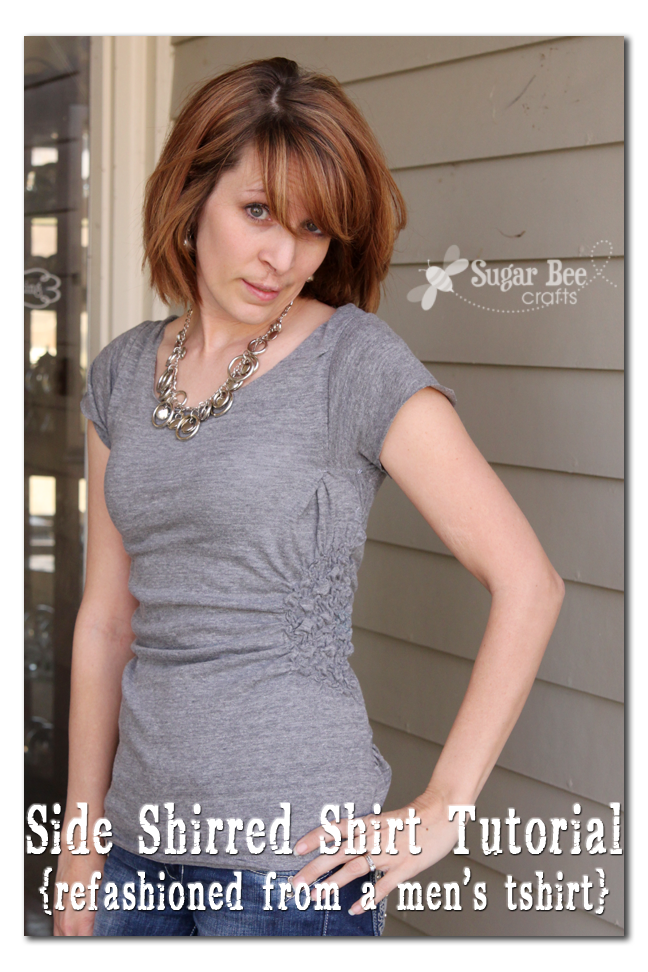
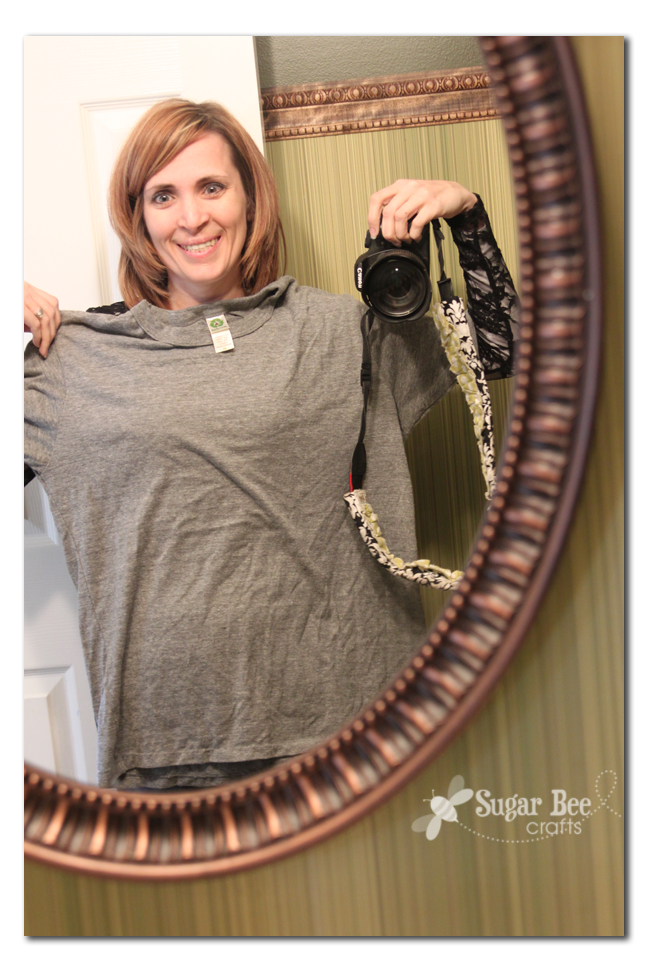
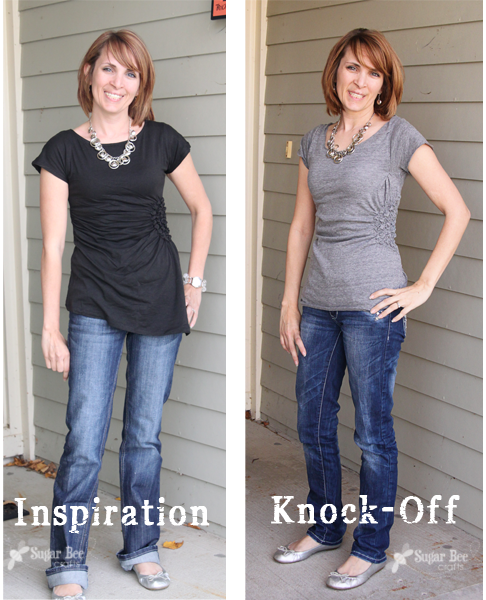
Side Gathered Shirt
SUPPLIES:

–>you’ll also need elastic thread.
Don’t be scared of it – it may be your new best friend! I love sewing with elastic thread – it just makes things more fun.
For posts about using elastic thread in your bobbin:
–Shirring (sewing with elastic bobbin thread) hints HERE and HERE
So, handwind your elastic thread on your bobbin. Also, you can change your needle to one for knits if you want.
TUTORIAL:
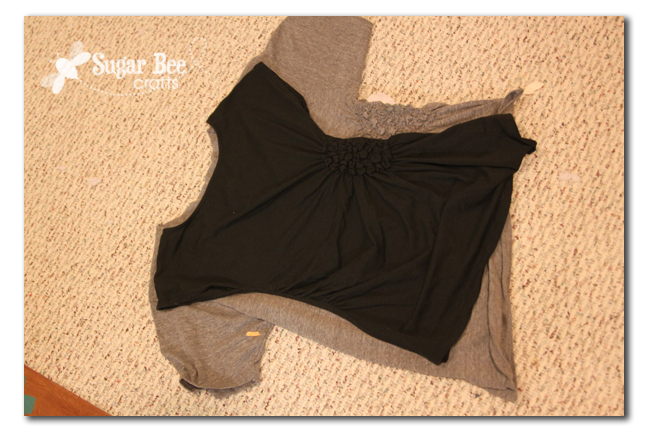
Now, I made the side gathering first, and then altered the shirt to fit me. In hindsight, I wonder if I should have altered the shirt first and then gathered the side.
To gather the side, you are going to sew rainbows of loops. I drew a picture so you could see what I mean – there’s a couple loops in the center, then 4 archs of loops surrounding it. I made it one continuous line of sewing:

It’s several half-circles, all looped. I used a fabric marker to draw on my shirt the first row, but just eyeballed it after that. I’m not going to say this was easy – it’s a bit tricky. It does get better as you work your way out from the middle, so stick with it. Try to hold your shirt flat as best you can and that will help.
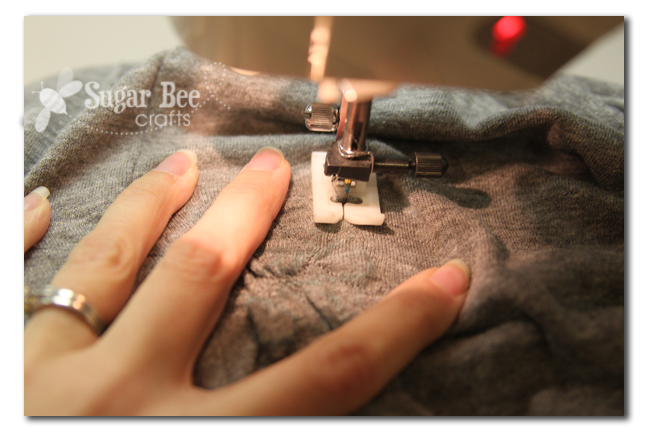
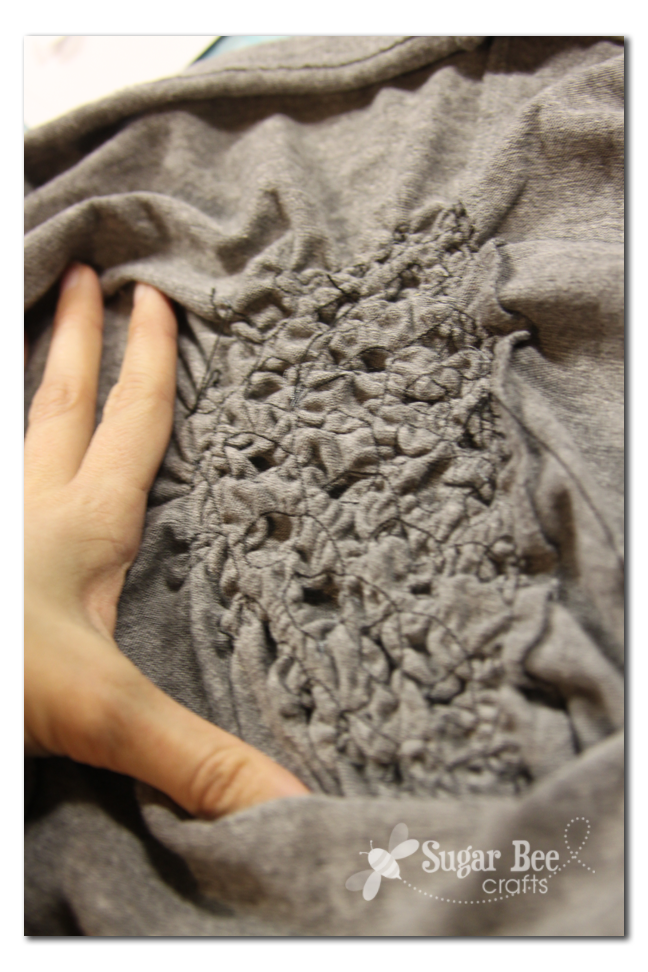
Phew, done! Here is what my front looks like – not exactly like the original shirt, but pretty close. If my loops were uniform, it would have come out better, but loops are so hard to sew! Making tight turns is tough – a hint, you can’t tell they’re precise loops in the end, so I made a lot of mine triangles – sewed a little, put the needle down, pivoted, sewed a little, put the needle down, pivoted again.

Here is what the underneath side looks like – you can kind of see the loops if you look close:
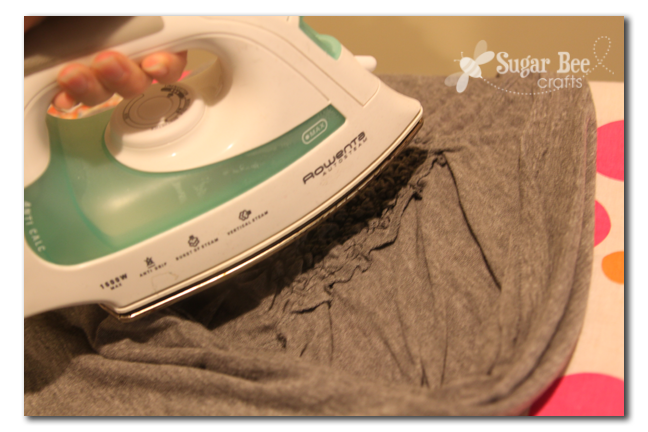
Now, as mentioned in the this post with the shrinking shirring video, – you need to steam the elastic thread so it’ll shrink and pull in on itself – – use your iron to squirt steam on it:
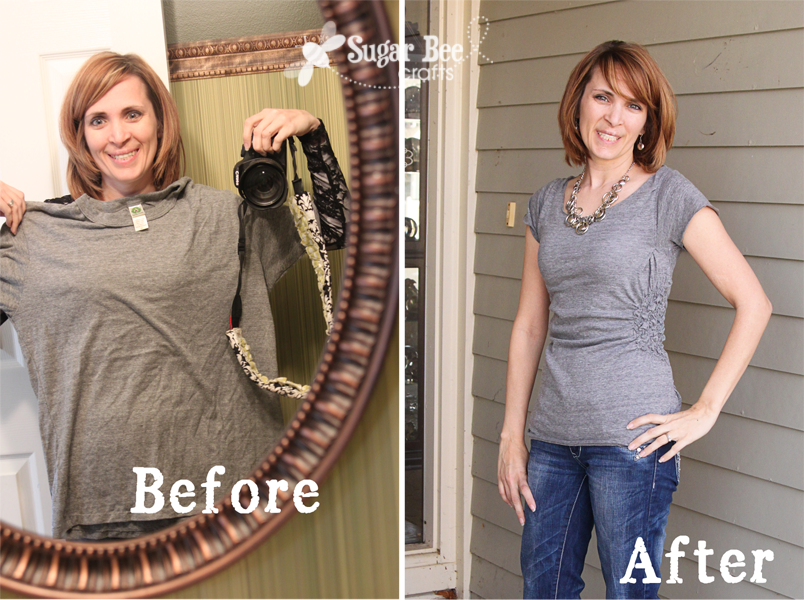
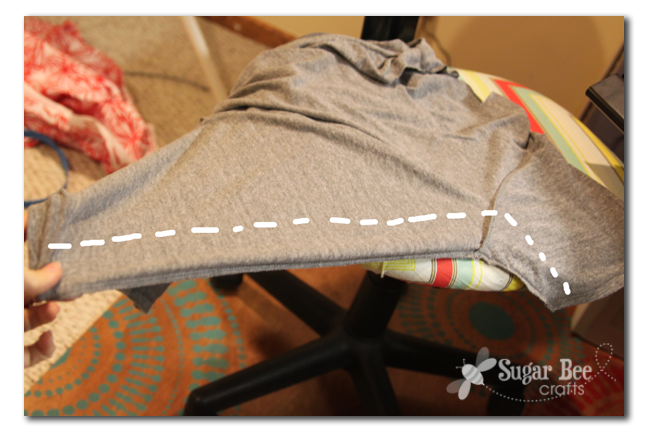
Now, time to alter the shirt to fit – – here’s the size difference:
I started by turning it inside out and sewing on that dotted line, taking in several inches. After that I kept trying it on and taking in different spots – shoulders, more on the sides, etc. It was tricky and it’s still not quite right. Kudos to all you who refashion giant tshirts – it’s tricky!
Here’s a side view of the shirring and refashion. The shirring looks pretty good – you can kind of see where I tweaked it to fit better by pulling it tighter across the chest and tacking it down – that’s why there’s a weird spot near the armpit:
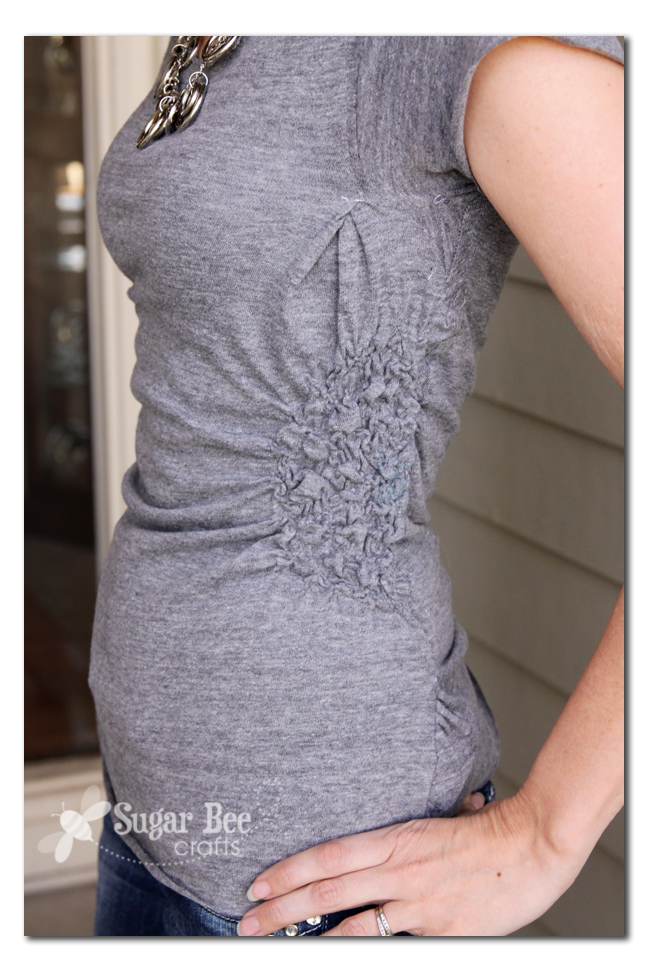

For the neck and arms I ended up just cutting off the ribbing and leaving it as-it. I tried to hem it in a spot but it was really puckery, so I unpicked it and thought leaving it looked okay and just went with it.
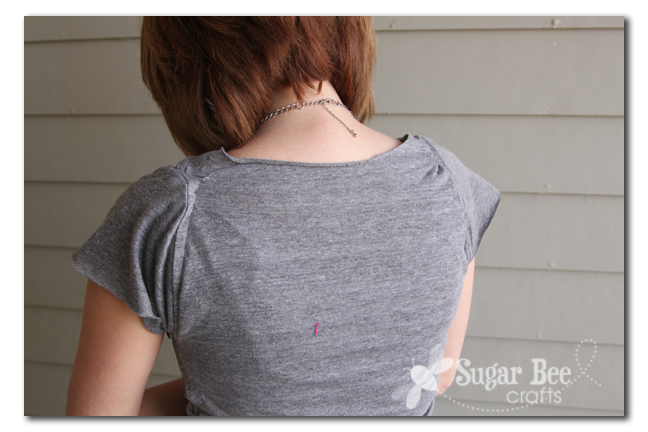
It was also really big across the shoulder area in the back and it’s pretty obvious where I took it in. I think next time I’ll grab a shirt that’s only a size or two bigger, instead of extremely big like this one (I wear a small and it was an XL):
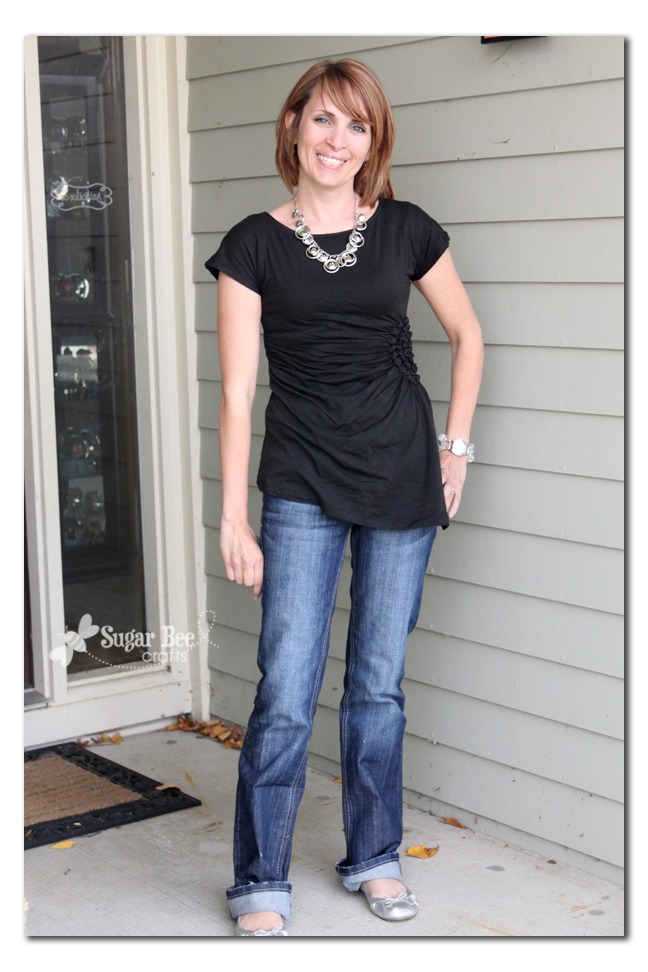
But overall, I’m pretty happy with my first attempt – you’ll have to let me know if you give this a try!!

i am so going to try this!
I love it – you always knock it out of the park! I really have to try elastic thread,that looks like fun.
I think it looks great! And that “tuck” in the front…looks like it goes there. 😉 Great job!
Thank you, Mandy! I’m one of the one’s who pinned the original shirt on Pinterest but was sad there was no tutorial for it. So cute!!!
That is so awesome! I wonder if I used a Maternity Top if I could save a step of altering the shirt. That is the part that would scare me the most. The elastic thread seems straight forward enough. I love this shirt and will definitely be putting it on my to do list.
Cool idea! Should work nicely. Such creativity found on this site. Just found it,and already loving it ☺
It looks fantastic! I bet you’ll get a lot of compliments on it!
Cool–now this one can go all crazy on Pinterest too 🙂 Man, I love that place!
Great job!!! It looks so cute on you 🙂
Love it! So cute ~ thanks for the tutorial!!! xo
This turned out really cute – you are so TALENTED!!
Thats awesome ! nice job!!!!!
This is awesome! I actually like your version better than the original. Nice job!
That is so cute. I’m got a new sewing machine a couple months ago but this looks a little too advanced for me :/. I will bookmark it though as a someday project 🙂
How cute! I’m so jealous of women that can sew! Me and sewing… do not co-exist! Instead… give me paints and walls! LOL!
Love, Olga
That is pretty awesome! I didn’t see any of the issues until you pointed them out. Thanks for sharing this.
Thanks for the tutorial! I am now on the hunt for a shirt to try this!
It looks just as good as the first one! I might even say the second one looks better on you since it’s made to fit you. 🙂
I have to try this. I get several free t-shirts when I do volunteer work and I’m always looking for a new way to “doctor” them.
Virginia
It looks great and I love the idea of using a maternity shirt; that way it would fit in shoulders; that part scares me too. Never used elastic thread, but you make it sound easy! Great job!
You nailed it! I love the top – great job and thanks for taking the time to share the tutorial!
LOVE! I think yours looks even better than the inspiration! Good job. Pinning this tutorial now!!! 🙂
I love that I’ve been meaning to do one like that after carefully inspecting a similar one at a store haha
This shirt looks great on you and is very flattering. I like the way it gathers and cinches off to the side. Great job as always!!
Jenny
That is so cool!!! I love your version!
I love your smocking details!
I am curious if a maternity style shirt would work better then men’s. Since it would still be smaller through the top and arms, but have room in the stomach area. Maybe you could do the shirring without so much resizing?! IDK? Very cute, the original and the repurposed version!
Sorry OurForeverHouse, just saw your comment about the maternity shirt too!
I think a maternity shirt is a great idea!!
this looks so good! wonderful job!
I think I like your version better than the original 🙂
THat is so cute!!! Wow! Awesome job! Love the necklace too! I am featuring this today at somedaycrafts.blogspot.com.
Looks great! I bet it´s supersoft.
Although, I believe the original shirring is actually shibori with elastic thread.¿What do you think?.
Congrats once again!
Felicitaciones!
Awesome! I guess I really need to get familiar with elastic threading… this is not the first thing I’ve wanted to make with the stuff.
When I refashion t-shirts, I’m working with oversized, already owned shirts. I cut off the sleeves and then reattach them after I cut it to fit the kind of sleeve I want. That would take care of that weird underarm thing you have going on.
Wow! It looks great!
This shirt came out so awesome!! I would love if you would share it at my I Love Fridays link party 🙂
i think your knockoff looks better!!
Makes me wish I had a half-decent sewing machine! I love practical projects like this!
This looks so good! So jealous that you know how to sew like that, but am inspired to try something like this once I get a sewing machine! Great job!
This looks like such a simple DIY and turns out great! Thanks for sharing 🙂
xo Shane
shaneprather.blogspot.com
your kidding!! fabulous!
I am your newest follower..pls follow back if you can.
Amazing Mandy!!!!
That is awesome! The finished product is SO cute. Thanks for sharing!
Seriously adorable!! I love this idea of using an old shirt to make NEW!! You are so cute!! Thanks so much for linking up to Sassy Sites for our Friday ffa party! Have a fabulous weekend!
XOXO!
marni
Super cute! I may try this myself!
thanks for the tutorial 🙂
What a great tutorial. The top is so fun.
Just so you know… you were featured today over at Sassy Sites! You got a BIG shout out so come by and grab a button! XOXO!
Marni
This looks so awesome. I really enjoy your blog, btw! I look forward to it in my reader.
If you’re interested, we’re hosting our first ever link up party. Please stop by and link up! https://www.waywardgirlscrafts.com/2012/01/wayward-weekend-week-1.htm
Found you on I Heart Nap Time. Love it!! Great job!
~Heather
Thanks for the tutorial, great job!! =)
I’m definately going to try this. Will be pinning it right now!
I think it’s pretty freaking amazing!
Number 1: This is darling, so talented! #2: You are a HOT mama!!
This was by far the most viewed link on my link party lat week! You are so cute! It turned out so good! I am featuring you in tonights link party!
xoxo, Ashley
This was a huge hit at Once Upon a Weekend! Thank you SO much for linking your amazing projects at my party. I am featuring this tonight.
And thanks for the great tutorial. I loved reading it, and now I’m itching to try something like this!
http://www.familyeverafterblog.com
I love all the comments saying you were the most viewed at link parties. DITTO! #1 spot on our link party too (:
Wow, you’re so clever! Good job
I like the knock-off better! Great job. I bet something like this could be used for maternity too.
I saw a sewing craft in the past week or so from a girl who quilts a lot. she was making something to wear I believe, but the design required turning a lot too. she suggested and used a freeform needle used for quilting so she didn’t have to keep turning, starting and stopping. maybe it would work with this project? Just a thought. purely an amateur sewer, but though it would help anyone who might want to give it a shot.
I love how you took a designer shirt and made your own version. Do you think you could do the same with this shirt? I don’t have a sewing background, so although it seems as if it should be simple,I can’t figure it out!
https://www.phase-eight.co.uk/fcp/product/warehouse/Knitwear/Megan-Pleated-Detail-Jumper/401122019
so cool!
elastic thread??? you have just made my year! also, the top of the grey one is much nicer than the black one. great job 🙂
Ya know what, this would be super cute with a yellow shirt, and painting the little poofs with brown fabric paint – like a sunflower. I guess you could do that with any type of flower that looks similar, like a daisy, a white shirt with yellow poofs. Anyways, just an idea 🙂
Don’t fix “the wierd spot near the armpit”! All the little adjustments make it better!
Ooh… just had a thought. What about using a MATERNITY shirt? It’s meant to fit the upper half, but has a lot of extra fabric in the front for gathering/shirring. I’m totally going shopping for some elastic thread! THANKS!
I LOVE this!!!! I have a shirt that is too wide and not as form fitting as I like it… I think this would do the trick! :o)
Hey Mandy,
Fell in love with the shirt went to the thrift store yesterday and found the just shirt that I think worked great had to play with the elastic swirls a bit but I faked it and think it worked out well ended up doing it to the sleeves as well to make them a little more snug…had a blast cant wait to play more with the elastic shirring. Also took up the sides had bought a 2x large womans it still looks great for my first remodel. Thanks for a great Tutorial
I love this! I want to try this with a T-shirt for my daughter!! She’d look absolutely adorable in a shirt like this.
Really nice!!
Awesome – thanks for sharing! I don’t sew, but maybe I can convince my friend to help me!
I already have the shirt and now need the thread! I going to try!
Hiya hun,
Just wanted to let you know that I featured this on my blog this week. I would love it if you could check it out 🙂
https://mammymade.blogspot.com/2012/09/mint-stuff-ive-seen-22.html
– Adele @ Mammy Made
So glad you put this together!! I read one comment about a quilting needle, but wondered if you’ve ever looked at a walking foot for your machine? It’s great!! You drop your feed-dogs and more or less just “draw” your seams. No twisting your fabric to follow the seams. Putting your project in a hoop and spraying it with a starch can also help to keep it flat so to achieve a consistent loop (or what-ever). With knits they will stretch in when put in a hoop but a wash-out fusible stabilizer can also help with that. I look forward to reading more from your blog!!
~Alice Nielson
I think you mean ‘free motion foot’. A walking foot has feed dogs on the top as well so all layers of fabric are moved along. :]
I`ll just say WOW!
i dont know if anyone has already said this, but if the loops are bigger then the little things that pop will be bigger like they are in the original.
I’m glad you said “Don’t be afraid of elastic thread.” Frankly, I think it’s scary!! This top is so cute though, it might be enough to get me over the fear! Thanks for a great tutorial! -Marci @ Stone Cottage Adventures
This may be a bit more work, but, I think if you sewed an xl front to a s back, you would have the fabric for the gathers and not have the shoulder puckers. Just an idea that I will try when I get some elastic thread. 🙂
That is too cool! I need to go steal some of my hubby’s t-shirts 🙂
Wow you did a great job!! And the little “oopses” you mentioned looks intentional so all was fine!! Can’t wait to try it!!
For someone that can’t sew a stich and isn’t an ounce of crafty.. I would love to know where you got the original shirt. It’s fantastic. Great job recreating it!
I got it at Downeast Basics, maybe a year or two ago. Love it!
This is great- unfortunatly my eyes aren’t as sharp + have let my sewing skills go. Love this shirt, awesome what you have done with it. Hmmmm let me figure out a plan…. lol
OMG!
I just arrived to your blog from Pinterest, and I love It!
I always wanted learning to sew, but it’s not my thing…
This t-shirt is awesome 😉
Looks great! Now if I only had your body. ..
Thanks for the awesome tutorial, what a cute shirt.
I will definitely be doing this one. My daughters who hate flowers, and all things ‘girly’ will love this!
I just did one of these. I love it! Thank you for the tutorial! I added a row of shirring up the other side as well. I can’t wait to wear it!
Could you post some more pictures of the original shirt, such as the inside. So that the stitching is visible? Thanks
Thanks! Thanks a lot!
Kiss from Serbia,
Cale
I’m planning to make a swim outfit (short leggings with a skirt and attached tank) and I’d love to try this with swimsuit material. Very cute!
oooh, I’d love to hear how that comes out!
Awesome tutorial, thank you…
Embroiderymad recently posted…A Boy Quilt!!!!
I love this!! I agree with the earlier persons post that yours is better. I like your sleeves. I put it on my pintrest in a file called easy sewing. Now that I have read it I might have to change it. Not sure it would be as easy as I originally thought. I am taking a sewing class in a couple of weeks I may try this after.
I love this tutorial. Such a great way to change the look of a shirt.
thanks for stopping by the blog!
Hi, I haven’t read all the comments so someone may have already thought of this, but I wonder if sewing the loops in free machine embroidery mode (ie with the teeth down) would make sewing the loops any easier?
great question – I haven’t tried it, but I’d be interested to hear how it turns out – it does sound like that might be an easier approach…
Honestly, I like the part that you thought was awkward, if you had done that a few times around and made it into a flower shape, and it probably would have compensated for the oversized shirt a little more? But it’d probably be more work that way, so nevermind.
glad you posted your gathered tshirt tutorial. my question is , how do you thread your elastic thread? what kind of needle used??
the elastic thread goes in the bobbin only, and it’s handwound – just wrap it by hand. I use a ball needle since I’m working with knit. Good luck!
Yours is so much nicer than the bought one.
Excellent job
Has anyone tried this by lowering the feed dogs and using a free motion quilting foot? I think it may make sewing the loops easier.
Thank you for your informative Article,its very helpful for me.I learned a lot from you.waiting for your next content
.Thank you so much for this blogg.Love You.